


Do websites sometimes load really slow for you although you have a decent internet connection? If this especially happens during peak-times, i.e. in the evening, your provider’s DNS server might be overloaded. Luckily, using an alternative DNS server can solve this issue for you. Here’s how to find the best DNS server for you to improve your browsing speed:
Table of Contents
What are DNS-servers and what do they do?
Before we get started to find a good DNS server you should understand what DNS servers do. I’m not going into details here, but here’s a (really simple) description.
DNS stands for Domain Name System. Whenever you browse the internet, your computer (or mobile device) uses a DNS-server to translate the URL (for example www.google.com) of a website to an IP (173.194.44.1 for google.com) to display the content of the website using the TCP/IP protocol. To say it in a few, non-technical words: The DNS Server is (partly) responsible to display the content of the website on your computer.

If you want to go into more technical details, HowStuffWorks has a nice guide with tons of information.
Knowing this, you can now understand why the surfing the internet may seem slow during peak hours. If the DNS server that you’re using is overloaded, connecting to a website can be slow even with a fast internet connection. But don’t worry! Finding a decent DNS-server is quite easy and changing it can be done in a few steps.
How to find the best DNS server for your connection
Namebench is an free Open-source DNS benchmark utility for Windows, Mac OS X and UNIX. It runs a benchmark using your web browser history, tcpdump output, or standardized datasets in order to generate a personal and individual recommendation for a DNS server.
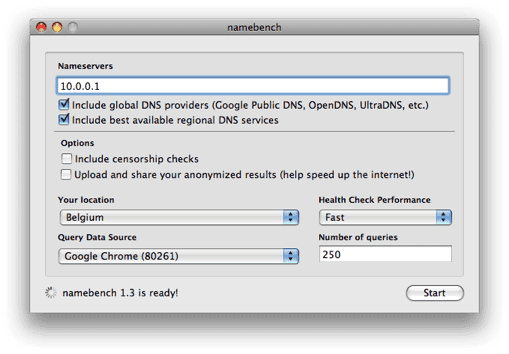
Simply download and install the app and you’re good to go. However, beware of the “include censorship checks” function. It makes some request to some fairly horrible websites that you (or your boss) may or may not wish to see on your DNS request log.
Namebench requires roughly 5 minutes before the program will suggest the three best-performing DNS servers for your connection. That’s it – easy right?
How to change DNS servers on Mac or Windows
Now that you’ve found a great DNS server, you have to tell your computer or mobile device to use it. There are two ways to do this: Adjust the settings on your computer or, if your router supports this feature, directly in your router settings.
Changing the DNS server on your router has a few advantages:
- Everybody connected to your WiFi uses the best DNS server
- You don’t need to setup all your devices
- Unlock services on devices where you can’t change the DNS settings
To change the DNS settings on your Mac, simply go to your system preferences, click the network icon and the advanced button on your preferred connection (like Wi-Fi or Ethernet).
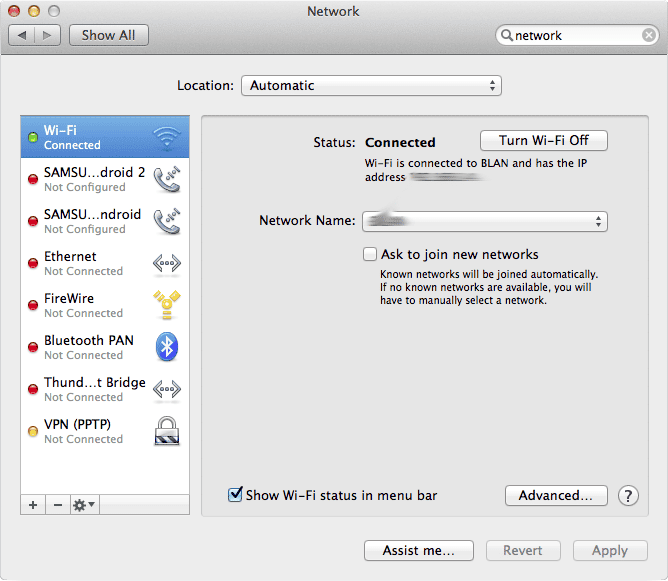
In the advanced settings, hit the “+” button in the DNS settings. Now go ahead and enter the DNS servers, click on OK and Apply. That’s it!

If you’re using Windows, open the “Network and Sharing Center” in your control panel.

Clicking your internet connection will open the connection status menu. Head over to the Properties situated in the lower left corner. In the next menu you need to select Internet Protocol Version 4 (TPC/IPv4) and hit the properties button. The next menu will open the DNS settings.
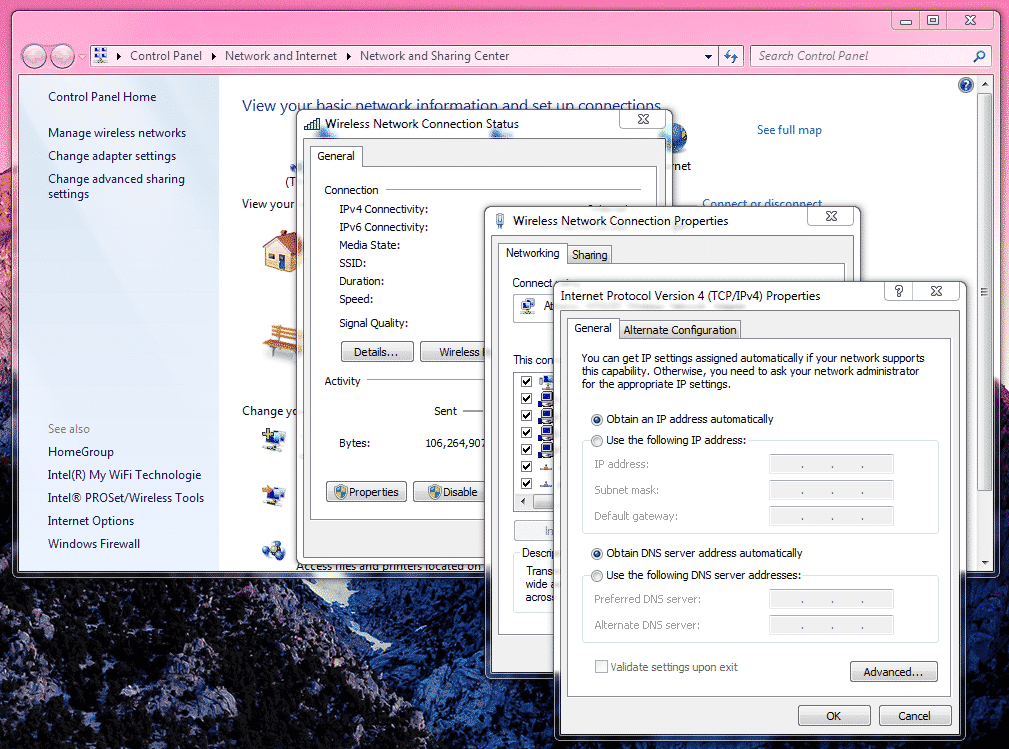
Click “Use the following DNS server addresses” and enter the IP addresses you received earlier from Namebench. Hit OK and you’re good to go!
I hope that I was able to help you to speed up your internet connection. Let me know if you have any questions!
Comments are closed.