

[su_button url=”https://trendblog.net/automatically-download-tv-show-episodes-when-available-and-aired/” style=”flat” background=”#00aeef” size=”5″ center=”no” radius=”0″]<– PART 1[/su_button] [su_button url=”https://trendblog.net/raspberry-pi-basic-headless-setup-without-cables/” style=”flat” background=”#00aeef” size=”5″ center=”no” radius=”0″]PART 3 –>[/su_button]
Welcome to the second part of our guide “Automatically download TV show episodes as soon as they are available“. If you only need to know how to install Raspbian on your SD card, your still in the right place.
In this post, you’ll learn how to install the popular operating system ‘Raspbian’ on an SD card using a Mac or Windows machine. After doing so, you can continue setting up your Raspberry Pi which I’ll show you in the next part.
Table of Contents
How to install a Raspberry Pi operating system on an SD card
Before you start, you (obviously) should have a microSD card and a computer with an SD card reader. Besides that, download the Raspbian image file directly from raspberry.com (don’t forget to unzip the image file!). Done? Good, let’s get started.
For OS X users:
Put your microSD card into your card reader (and connect it to your Mac if your using an external reader). For this to work, your microSD should be empty and formatted in FAT32.
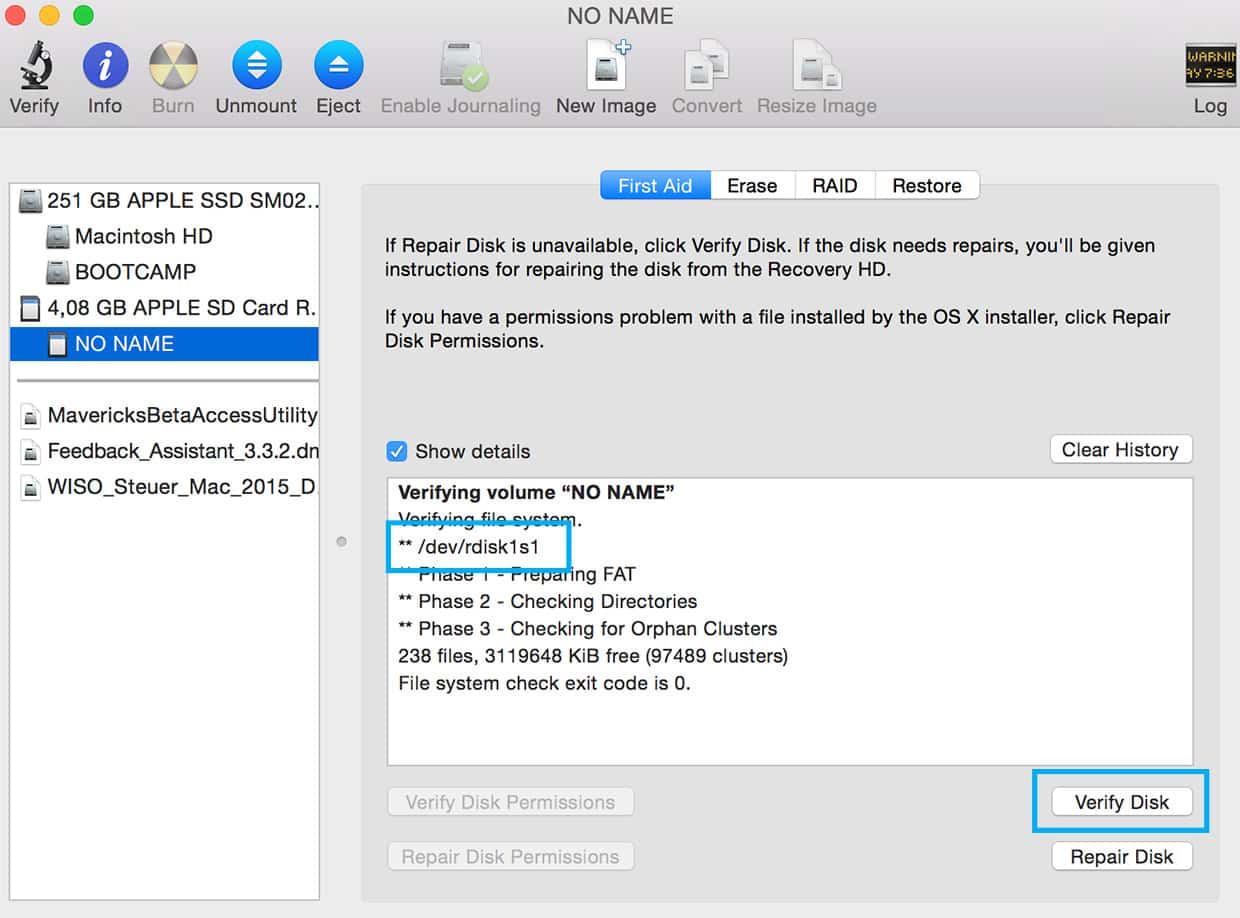
Go to your applications and open up Disk Utility (or just use Spotlight). Now we need to find the microSD card’s so called BSD number which looks like “diskn” where “n” is a number. To find it, select it (left side) and click on ‘Verify Disk’. Now, have a closer look at the appearing lines of text. There should be a line very similar to “/dev/rdisk1s1”. In this example, the BSD number would be “disk1”. With your microSD card still selected, click on ‘Unmount’ in the top menu bar of Disk Utility.
Now all you need to do is open up Terminal (in your Mac’s applications) and run the following line:
sudo dd bs=1m if=path_of_your_image.img of=/dev/disknMake sure to replace “n” from diskn with the right BSD number. Also, you need to include the complete path of your Raspbian image file. An easy way to find a file’s exact location is to drag and drop the file into the Terminal window.
So an example could look like that:
sudo dd bs=1m if=/Users/marc/Desktop/2014-12-24-wheezy-raspbian.img
of=/dev/disk1
After hitting Enter, you’ll be prompted to enter your system password (the one you use to log into your computer). Now, the image file is being transfered and installed on your microSD card. This can take a while. During the process you won’t see any feedback in your Terminal window so be patient until you see many new lines confirming a successful image transfer.
That’s it! You can now plug your microSD card into your Raspberry Pi.
In the next part we’ll show you how to do the initial setup of your Raspberry Pi.
For Windows users:
- Insert your microSD card into your card reader and find out its drive letter in Windows Explorer (for example G:).
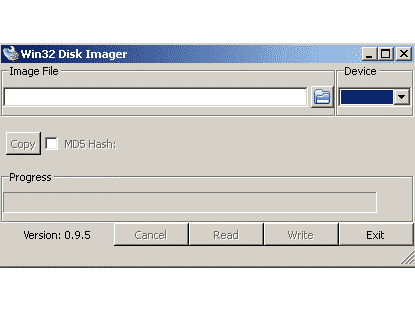
- Download Win32DiskImager, unzip the downloaded file and run the utility file.
- Select the Raspbian image file you downloaded.
- Select the drive of your SD card in the ‘Device’ dropdown. Make sure you chose the correct one. Otherwise, you risk damaging the data on your hard drive.
- Select ‘Write’ and wait for the process to finish. That’s it!
- Now you can plug the SD card into your Raspberry Pi’s slot.
The next part of this guide will show you how to setup your Raspberry Pi. It will be released next week, so stay tuned!
[su_button url=”https://trendblog.net/raspberry-pi-basic-headless-setup-without-cables/” style=”flat” background=”#00aeef” size=”5″ center=”yes” radius=”0″]GO TO PART 3[/su_button]
Hey, a common error is “resource busy” while copying an image via dd. to fix, first do sudo diskutil unmount /dev/diskns1 where n is your drive number.
Thanks. I got the “resource busy” error and this worked for me.
of=/dev/rdisk{n} is approximately 10x faster.
Thanks!
I have a question. What exactly is the process of writing image file into the SD card using program like win32diskimager or Disk Utility in mac ?? I was wondering if it works by just directly dragging and dropping the file into the SD card via directory as we use ‘mv’ commands in linux.
No, the raw contents of the image are written to the raw device (SD card). It’s not the same as ‘mv’. ‘mv’ happens on top of a filesystem, where-as the ‘dd’ command overwrites the filesystem. I hope that makes sense.
Another tip for using dd on Mac, ‘control+t’ while the dd command is hanging will output progress.
And for me bs=1m was going very slowly, I had much better luck with bs=1048576. I read somewhere else that bs=1m doesn’t get parsed correctly so it evaluates to block size=1, not sure if that is true or not.
Win32DiskImager suggests that my write has completed successfully;
upon completion; my SD card(F:) seems to have created a partition(G:) within my sd card Computer->(F:) ->(G:)
Once doing so it asks if I would like to format the drive(G:) before using it, should I do so as recommended by system?