


In my last article, I talked about the need to use two-factor authentication as an additional security step to secure your online accounts. Since I often get questions from people regarding what they see as a “really technical topic”, I have decided to write up a guide on it. It’s really not all that difficult to set up and use, as you will see.
Two-factor authentication (2FA) also goes by two other names – Two-Step Authentication and Multi-Factor Authentication. But no matter what name it goes under, it all works the same way, and you MUST use it if a website supports it. It would mean the difference between being hacked and not being hacked.
Table of Contents
What Is 2FA & How Does It Work?

Let’s start with what it is and the theory behind it.
2FA is a second layer of security for your online accounts (when you consider your regular password to be the first layer). It is a code which must be entered into the website in question – after your password – to prove you are the rightful owner of the account, and not some pimply teenage hacker in his bedroom looking for erotic selfies in your email.
There are three methods of obtaining a 2FA code in order of strength (the strongest going first, in my opinion).
1. An Authenticator App
An authenticator app is a free app for your smartphone, which automatically generates new 2FA codes every 30 seconds or so. You must set everything up between your website service and the authenticator app beforehand, and enter the correct number shown on the authenticator screen. Some websites lock you out for a certain period of time if you get the 2FA code wrong, say three times in a row.
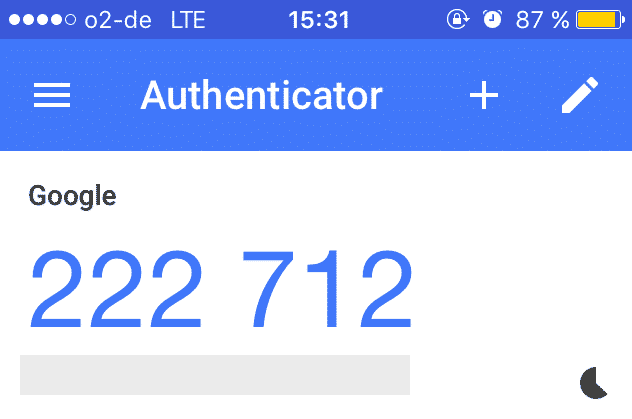
The biggest and the best authenticator app is Google Authenticator. Available for Android and iOS, it is simple to set up and use. Its closest rival is Authy, and another which is steadily gaining rave reviews is FreeOTP, which is beloved for being open-source, and therefore the code is open to inspection. There is an app called Clef, but it is shutting down on June 6th 2017, so stop using that one.
I hate to sound boring, but I started with Google Authenticator, and it has never let me down. So they have never given me a reason to switch. I tend to stay intensely loyal to a product, unless they give me a reason not to be loyal. So I highly recommend Google Authenticator to you.
So download it right now (download links above), and later I will be showing you how to set up 2FA on some of the major websites.
2. SMS Codes

As I alluded to in my article last time, if a hacker knows your mobile number and the company you have your phone service with, they could clone your phone or social engineer the company to have all text messages with 2FA codes re-routed to them. This is why you should never publicize online the number of your mobile phone connected to your 2FA accounts – especially on social media.
But despite those risks, SMS codes would be fine if you really didn’t want to use an authenticator app (or if you didn’t have a smartphone to install an authenticator app). The method is not fantastic but in a pinch, you can cross your fingers and hope for the best. And let’s face it – having 2FA SMS codes enabled is better than NOT having it enabled.
Turning on the SMS codes option is something you would need to do in the website settings. Again later, I will be showing you how to set this up with some of the big name websites.
3. Yubico U2F Security Key
The third – and weakest (in my opinion) method is a U2F Security Key. I have one, for the purposes of testing it, but I refuse to take it outside the house, because of what I see as its inherent weakness.

A security key is only compatible with some 2FA sites, and the one that is used by Google and Facebook is called a Yubico U2F Security Key. They are very cheap (you can pick one up on Amazon for $18), and they work by plugging it into a USB port and pressing the gold key button in the middle. That is essentially your 2FA code right there, and it gains you instant access to the account.
Which is where the weakness lies. All someone has to do is steal your security key and press the button. Granted they would need your password first, but then one press of the security key button and in they go. So I am not a big fan of this method. It’s a bit like building a security wall around your house using toilet paper. Rather flimsy and useless.
To get it working, you need to get into the settings of the account and register the key in the 2FA settings. Extremely easy.
How Secure Is It?

An account without 2FA would be just the password, and if someone finds out the password, then they are into your account where they can wreak havoc. But a 2FA-enabled account makes it extremely difficult, perhaps even impossible to break in. Because to get past the 2FA layer, the person trying to break in would need access to your mobile phone. Keep your phone on you at ALL times, put a strong PIN lock on the screen, and let nobody use it. Suddenly you have a web account which is virtually impenetrable.
To quote Pink Floyd – “all in all, it’s just another brick in the wall“.
Setting Up 2FA On Some Of The Big-Name Sites
In order to understand the whole concept better, we are going to run through how to set it up on 3 different sites – Gmail, Facebook, and Twitter. All support the Authenticator app, and since that is the strongest 2FA method in my opinion, that will be the one I will show you how to set up. I will also briefly mention the other methods if they are supported.
Before proceeding, make sure you have the Authenticator app installed on your phone. Here are the download links again – Android and iOS.
Gmail
2-Factor Authentication is actually set up in your Google account. It will then be used whenever you log in using your Google user details in places such as Gmail, Drive, Feedburner, Calendar, and more.
First, go to your Google Account settings page and sign in. Then on the page that follows, click on the “Sign-In & Security” section. Scroll down to “Signing into Google” and on the right, you’ll see an option for “2-Step Verification“. Click on it now.

On the next screen, click “Get Started” at the bottom. You will then be asked for your account password, to confirm it really is you.
On the next screen, you will be asked to choose a phone number where your authenticator app is installed, or where you want your text messages sent. If you haven’t already given Google a number, you will be asked to supply one and it will be verified by a text message sent to you.
Even if you plan to use an authenticator app, choose “text messages” at the bottom. This can be changed later.

Google will now send you a verification text message. Enter the code you are sent into the box provided and proceed to the next screen, by clicking “Turn On“.

Google has introduced an alternative 2FA method where you can tap a button on your smartphone screen (similar to the Yubikey key). You need the Google search app for it, and when it is installed and logged into the Google account, you can set up this method.
You should also download the backup codes, provided on this page. If you lose access to your phone, you can log into your account using a backup code. These codes can be used only once, and needless to say you should guard them like a hawk.

If you scroll further down the page, you will see the options for Google Authenticator and Yubikey.

Let’s start with the security key as it is the easiest and the fastest to set up. Click on “Add Security Key“. You may have to log in again. Then enter the security key into your USB port. The gold key button in the middle should now start flashing. Press the button (in fact, you just need to lightly tap it).

When your account has detected the key, it will show as being registered and you will be invited to give the key a name (so you can tell them apart in case you have more than one registered).

Going back to the main 2FA screen, it will now show the security key as being registered and ready to rock.

Now Google Authenticator. Scroll down to “Authenticator App” and click “set up“. You will be asked what kind of phone you have – Android or iOS – and then you will be taken to the next screen where there is a QR code.

Open the Authenticator app, select “set up account” and scan the QR code with the app.
The code for that account will now appear in your Authenticator app.

Google will now ask you to enter the current code into your Google account to verify that Authenticator is set up properly. And that’s it.
Go to your Facebook Security Settings, and the second option is “Two-factor authentication“. Click on the “edit” link to the right of the option.

This expands the box to show all of the options available. Click on “Set Up” and then click the blue “enable” button, to switch on 2FA.

Under “Text Message (SMS)“, you can enter your phone number, and after it is verified, you can have text messages sent with a 2FA code.
Under “Recovery Codes“, you can generate backup codes, in case you lose access to your phone (DO THIS! Make the backup codes, not lose the phone – obviously).
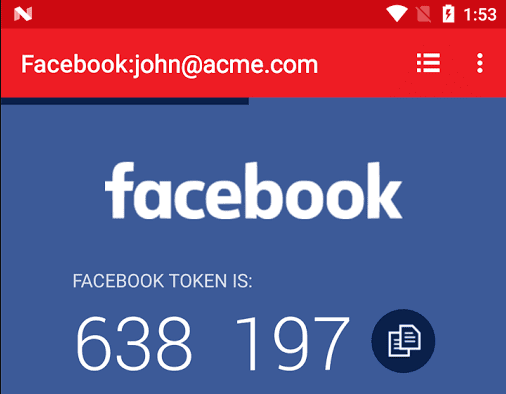
With “Code Generator“, you need the Facebook app installed on your phone. In the settings is the Code Generator option. This is Facebook’s version of Google Authenticator, but only for Facebook accounts. Enter the code on the screen and you are in.
Under “Security keys”, this is where you can register the Yubikey. Click “add key”, put your Yubikey into the USB port, click the flashing button and it’s registered.
You can use Google Authenticator on Facebook too. Notice under “Code Generator”, it says “Set up a third party app to generate codes”. If you click that link, you will get the QR code to scan in Authenticator. Enter the current Authenticator code into Facebook and that is done too. Easy.
The weird thing about Twitter’s 2FA is that they introduced it – then didn’t tell anyone. Eventually people saw it in their settings and wondered how long it had been there.
Go to your account settings and scroll down to “security“.

If you add a phone number to your Twitter account, under “Mobile“, then you can switch on “Verify login requests“. This is Twitter’s version of SMS 2FA codes.
“Setup a code generator app” is for Authenticator. Click the button to get the QR code, scan it, and enter the 2FA code currently in Authenticator for your Twitter account. Done.
Conclusion
As I have hopefully proved, two-factor authentication is not difficult in the slightest. It just requires a bit of poking around in the settings, and a bit of setup with your phone. In the long run, the benefits will be enormous, as YOU will be the one not getting hacked.
Let me know all of your questions in the comments and I will do my best to help out.
Thank you for updating us with the methods of implementing two-factor authentication. The process is really simple and quick.