

Windows 11 restore classic start menu. The streamlined menu bar in Windows 11 is designed to make your time with the operating system more productive. However, its design is very different from that of Windows 10. The menu is front and centre, and it includes programmes you may never use. It may take some time to adjust to Windows 11’s new features, so a menu that looks and functions like the one you’re used to is essential. You can enable the traditional Start menu and quick access to your most frequently used programmes by adjusting your PC’s settings.
Using this tutorial, you can return your Windows 11 machine’s Start menu to its earlier, more familiar state. We will also go through how to rearrange the menu items to prioritise the apps you use most often.

Table of Contents
The New Windows 11 Start Menu
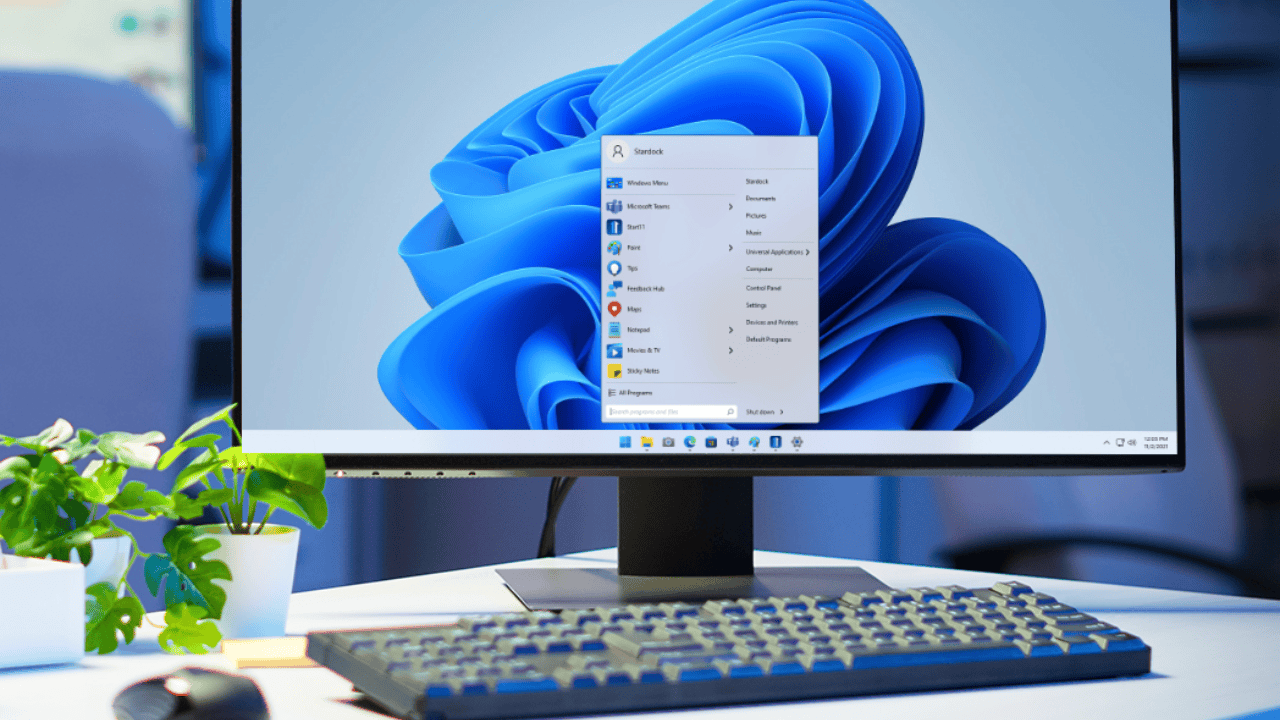
There are some obvious cosmetic changes between the Windows 11 Start menu and the Windows 10 interface users are used to seeing. Your pinned programs are located at the upper part of the menu, while you can access other programs by pressing the “All Apps” icon. Near the bottom of the menu, you’ll find a list of Recently Used Programs and Recommended Applications. Three buttons in earlier Windows versions serve as shortcuts for powering down, restarting, and hibernating. A single power button now gives you access to all of these settings.
The Start menu in Windows 11 has an ultramodern, sleek design. It was created to facilitate faster and easier access to your computer’s programmes. The learning curve for this new interface, however, is quite severe. It will take time for Windows users accustomed to the Classic Start menu to become comfortable with the new options. By enabling the classic menu, users may explore Windows 11’s features from a format they’re already comfortable with.
Windows 11 Restore Classic Start Menu
The Registry Editor is where you’ll make the changes to your PC that will enable the classic menu.
Note: In version 22000.65, modifying the registry is no longer supported. It’s limited to specific versions of Windows 11.
Using Windows Registry Editor
The Windows Registry is a data repository for your PC’s default configuration settings. These materials are essential to your applications, and with some careful editing, you may even alter their behaviour. Using the Windows Registry Editor, you can bring back the original Start menu by doing the following:
- Start by pressing the button and typing “regedit” into the search bar.
- Select Registry Editor from the list of results when it appears.
- If you run the Registry Editor on Windows, you’ll be prompted to confirm whether or not you wish to make changes to your machine. Select Yes from the pop-up window’s confirmation menu.
- To access this page, copy the following and paste it into the address bar, then press Enter: HKEY CURRENT USER\Software\Microsoft\Windows\CurrentVersion\Explorer\Advanced\
- The Registry Editor will open the Advanced Folder, where all of the user’s previously saved Windows settings will be displayed. Simply move down to the very bottom of the user interface, where you’ll see Start ShowClassicMode, and click twice on it.
- Type 1 into the Value Data box and click OK in the Start ShowClassicMode window’s lower right corner to apply the setting.
- Close Registry Editor.
- Simply restarting your computer will bring up the default settings menu.
Instead of restarting their computers, some users say they were able to activate the menu by logging out and back in. Restarting the Windows Explorer processes via Task Manager has also helped people revert to the previous menu. Try out different approaches to see which one functions best on your computer.
If you don’t have time to open the Registry Editor and make the necessary changes to your device, you can still get the old Start menu back. So, here’s how it goes down:
- The Windows Registry Editor file for the Classic Start menu can be downloaded here.
- You should copy the file to the desktop of your computer.
- To open the file, press the icon twice.
- When the prompt displays, select Run from the menu.
- If you want to enter more information, you can do so in a new window. In order to confirm, please tap the Yes button.
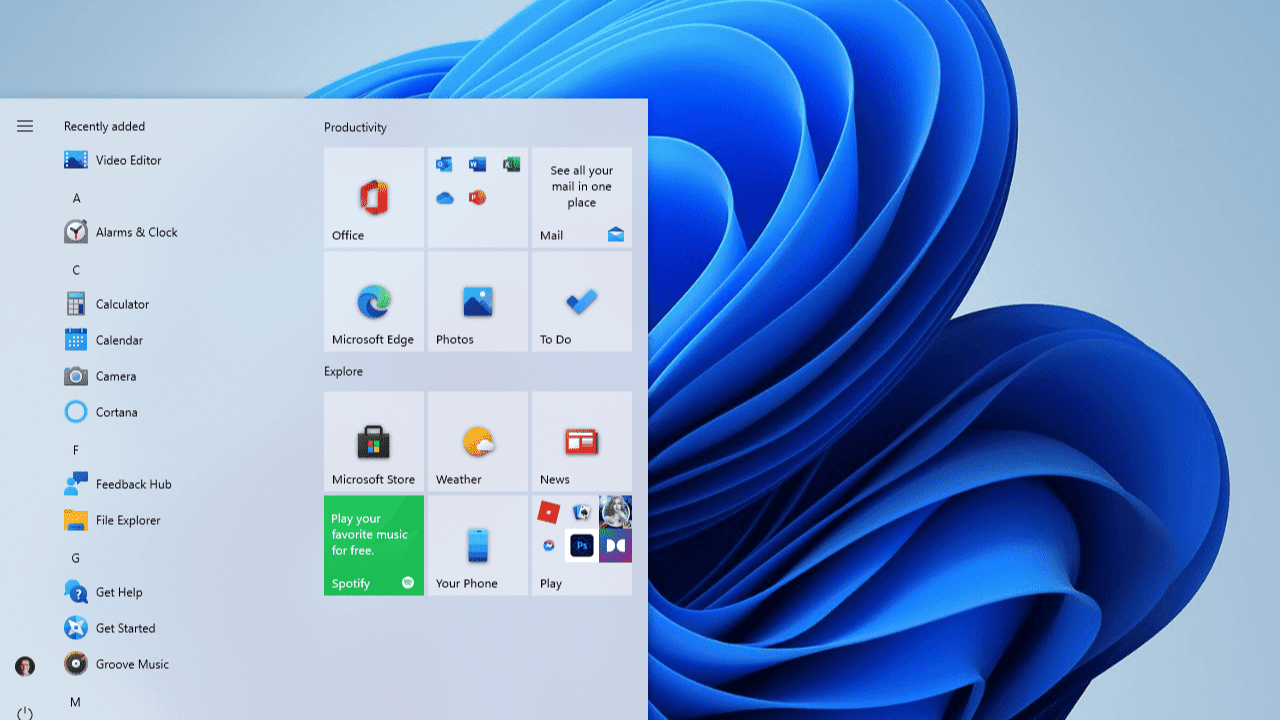
The Windows 11 operating system’s new Start menu takes design cues from its central processing unit, but also includes several new features.

How to Move the Start Menu in Windows 11
The Windows 11 interface displays the starts menu at the center of the screen. Some users may find this arrangement convenient, but most are used to seeing the menu bar in the bottom-left part of the desktop. Moving the Start menu to its previous position will combine the look of Windows 10 with the functionality of Windows 11.
To do so:
- To access the Run dialogue box, press the Windows key plus the letter R.
- Just type “ms-settings:” and hit the Enter key.
- Select Taskbar Settings from the list of alternatives that appears when you search for “taskbar” in the Settings window’s search bar.
- Simply choose Taskbar actions to reveal the submenu.
- To the left of the Taskbar should be an option you can select.
- If you restart your computer, you’ll find the Start menu on the left side of the screen.
Customizing the Start Menu in Windows 11
When you switch to the traditional menu, it won’t look like the current one. The same features will be accessible through the interface, albeit some apps may be concealed. You can change the look of the menu to easily reach the apps you use the most.
To do so:
- Access the Windows 11 Control Panel.
- Navigate to the Settings menu and select the Launch option.
- The new tab displays all installed applications, including those that have been recently used or hidden. In the Start menu, you can customise the apps that show by selecting one of the three options below..
The order in which your chosen shows are displayed is also customizable. Move apps around to where they work best for you by dragging and dropping.
Switching Back to the Windows 11 Start Menu
- To open Registry Editor, select the Start menu.
- Use the search bar to locate Registry Editor.
- Select the affirmative to let Registry Editor make changes to your machine.
- To access this page, copy the following and paste it into the address bar, then press Enter: HKEY CURRENT USER\Software\Microsoft\Windows\CurrentVersion\Explorer\Advanced\
- To activate Classic Mode, double-click Start ShowClassicMode.
- Fill out the Value Data box with 0.
- Once more, right-click Start ShowClassicMode.
- To undo the modifications, select Delete and then restart the computer.
To return to the Start menu’s factory defaults, perform this operation. The PC’s default startup configuration places the Start menu in the upper left corner.
A Menu That Meets Your Needs
To keep up with consumer demands and industry standards, Windows is continually developing new features and improving its existing ones. Having a menu that can assist you traverse various pieces of software is not only vital, but also improves the user experience. You can get the most out of your PC if you enable the traditional Start menu in Windows 11. You won’t have to spend any time familiarising yourself with the interface because of the convenient navigation bar. If you’re tired of Windows 11’s interface, you can bring back the classic Start menu with the Registry Editor. The Start menu in Windows 11: Do you use it? Which side of the screen does it sit on, the left or the right? Leave a comment and let us know what you think.
Also Read:
16 Top Best Video Editor in Windows 11
Windows 11 and windows 10 comparison: Is the Upgrade Worth It
9 Ways to Know How to Screenshot Windows 11: Latest Updates
Split Cells in Excel in Windows, macOS, Web: 2022 Updated
FAQs:
Q1: How do I restore the classic Start menu in Windows 11?
Simply move down to the very bottom of the user interface, where you’ll see Start ShowClassicMode, and click twice on it. Type 1 into the Value Data box and click OK in the Start ShowClassicMode window’s lower right corner to apply the setting. Close Registry Editor. Restarting your computer will bring up the original menu.
Q2: Does Classic Start menu work with Windows 11?
Making sure the Advanced button is pressed gets you to the right side, where you may create a new DWORD (32-bit) value by right-clicking an empty area and selecting the option.
Q3: What happened to the Start menu in Windows 11?
Once your new version of Windows loads, you will see that the Start menu has moved from its traditional location in the bottom left of the screen to the middle of the taskbar at the bottom of the screen. In Windows 11, the Start menu is a button in the middle of the screen’s taskbar.
Q4: How do I make Windows 11 look like Windows 10?
Access the Taskbar behaviours menu by going to Settings, then Personalization, and finally Taskbar. There will be a pull-down menu in a field titled “Taskbar alignment.” Move the pull-down menu to the left side of the screen. The adjustment will be made instantly.
Q5: Does Windows 11 look different than Windows 10?
Design. The visual style of Windows 11 is very different from that of Windows 10. Windows 11 has a tidier, more Mac-like interface than its predecessor thanks to its use of pastel colours, softer window corners, and less unnecessary buttons.
Comments are closed.