


The default font in Microsoft Word can be changed so that all of your Word files look the same. This lets you make your papers look the way you want them to. Learn how to change the font that comes with Microsoft Word in this complete guide.
Table of Contents
Setting the Default Font in Word for Windows
Step 1: Open Word for the first time. Open Microsoft Word after turning on your computer.
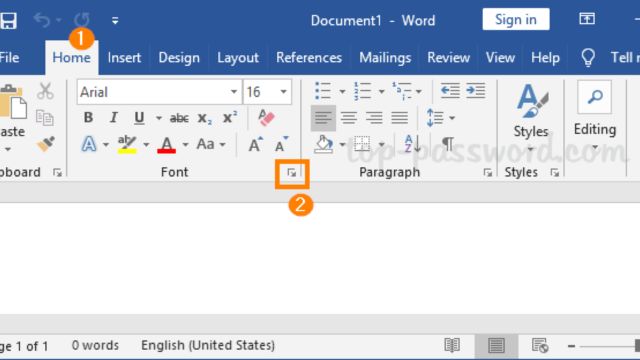
Step 2: Open the Font Box as the second step. Click on the little button in the bottom right corner of the “Font” group on the “Home” tab. You can also press “Ctrl+D” or “Ctrl+Shift+F” to open the Font box right away.
Step 3: Choose how you want the text to look. In the Font window box, you can pick the font, style, size, color, and any other settings you want to use all the time.
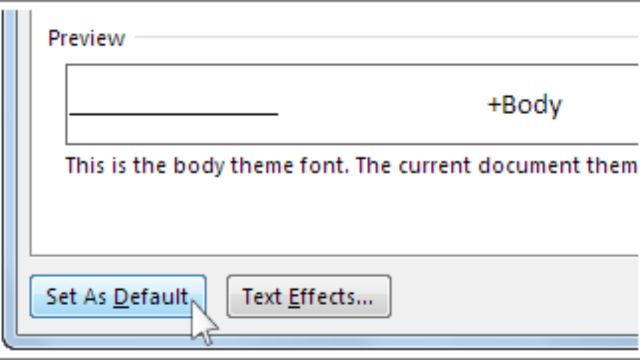
Step 4: Make it the top choice. Click the “Set As Default” button at the bottom of the Font box. There will be a new box that asks you if you want to change the font for this document only or for all documents that use the Normal style. For all papers that use the Normal design, choose this option.
Step 5: Be sure to use When you’re done making changes, click “OK.” Every new paper will now use the font settings you picked.
Setting the Default Font in Word for Mac
Step 1: Open Word for the first time. Open up Microsoft Word on your Mac.
Step 2: Open the Font Box as the second step. Select “Font” from the “Format” menu. You can also press “Command+D” to open the Font box right down the road.
Step 3: Choose how you want the text to look. The Font window box lets you choose the font, style, size, and other options that will be used in the background.
Step 4: Make it the top choice. Click the “Default” button at the bottom of the Font box. When you click “Yes,” you will be asked if you want to change the font that all papers that are based on the Normal style used by default. Set your choice in stone.
Step 5: Be sure to use If you want to use your changes, click “OK.” Every new paper will now use the font settings you picked.
Customizing Default Font for Specific Templates
If you want to change the font that is used by default for a style other than the Normal template, do these things:
Step 1: Open the file first. Get the file you want to change and open it. The new file could be based on the template or be the template itself.
Step 2: Do the same things you did in Step 1. To open the Font box, do what was said above. Then, pick the font you want to use.
Step 3: Save the file. Save the file after picking out a font. As you work on a new document that uses the template, save it as a template file (.dotx or.dotm). This way, any changes you make will be made to all documents that use this template in the future.
Conclusion
There is a way to make sure that all of your papers look the same in Microsoft Word. You can set a default font. It’s simple to follow, and you can make changes to suit your needs whether you’re on a Mac or a PC running Word. It’s easy to make your best font the default for all new documents or certain themes if you follow the steps above. This will make it easier and more personal to use Word.
For more updates, please bookmark our channel. You can also share it with your friends family or groups. If you have any queries, suggestions, or comments about our content or channel, please comment in the comment box below.
Moreover, you can also check out our detailed guide on How to Set Up a Teams Meeting in Outlook? or Why Should Development Teams Pick A Business Center Office Over A Separate Residential House? or How Microsoft Teams Can Help A Business To Implement A Hybrid Workplace?
Frequently Asked Questions (FAQs)
Is it possible to change the font for each page in Word?
Without a doubt, you can set a different style for each template. That’s it! Open the Font box and pick the fonts you want for each design. You need to save the template with the new settings in order to use the changes.
How do I change the type that comes with Word back to how it was?
When you open the Font box, choose the original font options (usually Calibri or Times New Roman), and then click “Set As Default.” This will change the text back to how it was before. Make sure that all of the papers that use the Normal design have the changes made.
It’s not working with new files, why is that?
It’s possible that your usual fonts aren’t being used on new documents. If this happens, make sure that you changed all documents that are based on the Normal template. The file you’re working on might have been made from a different template, which has its own set of basic settings. Take a look at that if the problem still happens.
Can I change how big the text in Word is?
These steps will open the Font dialog box. From there, you can change the size of the font that comes with Word. You can pick the font size and other options you want, then make that the default for all new files.
Do the fonts that come with Windows change files that are already there?
If you change the default fonts, they will only show up in papers that were made after the changes were made. When you close a document that is already open, the font choices stay the same unless you change them by hand.