


Welcome to our detailed guide on how to put an M.2 SSD in your computer! In this post, we’ll show you how to add an M.2 SSD to your computer to make it run faster and add more storage space.
This guide will walk you through the steps in a clear and easy way, no matter how much you know about computers or how new you are to them. So, let’s get started!
Table of Contents
What are M.2 SSDs?
Before we talk about how to install an M.2 SSD, let’s talk about what it is. M.2 SSDs are solid-state drives that come in the small, flexible M.2 size. So, information can move quickly. Compared to normal hard disk drives (HDDs), these drives start up faster, make it easier to see files and make the system run better overall.
Preparing for the Installation
Make sure you have all the tools you need and do some prep work to make sure the installation goes well. Here’s what you’ll need:
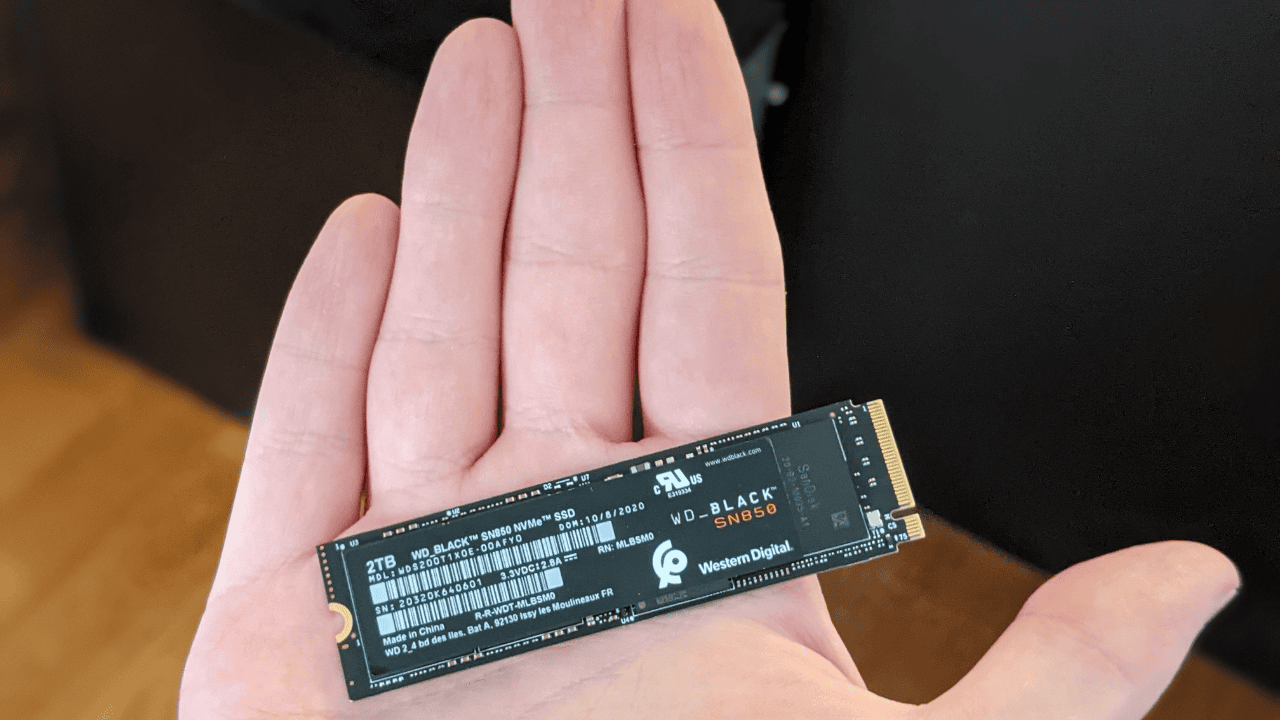
M.2 SSD: Choose an M.2 SSD that has enough room for your needs and enough speed. Think about how quickly it can read and write, how long it will last, and how much it will cost.
Screwdriver: Most M.2 SSDs need a small screwdriver to be put in. Find out what kind and size of screws you need by looking at your SSD’s specs.

Anti-static wrist strap: You should wear an anti-static wrist strap to stop static electricity from leaving, which could hurt sensitive parts.
Before you start anything else, make a copy of your important items. Even though getting shouldn’t change the information you already have, it’s better to be safe than sorry.
Installing the M.2 SSD in your PC
Now that you’re ready, let’s get started with the installation process. Carefully follow these steps:
Step 1: Turn off your computer and remove the cord. Always turn your computer off and unplug it before making any changes to its hardware. This keeps you safe and prevents damage to your machine.
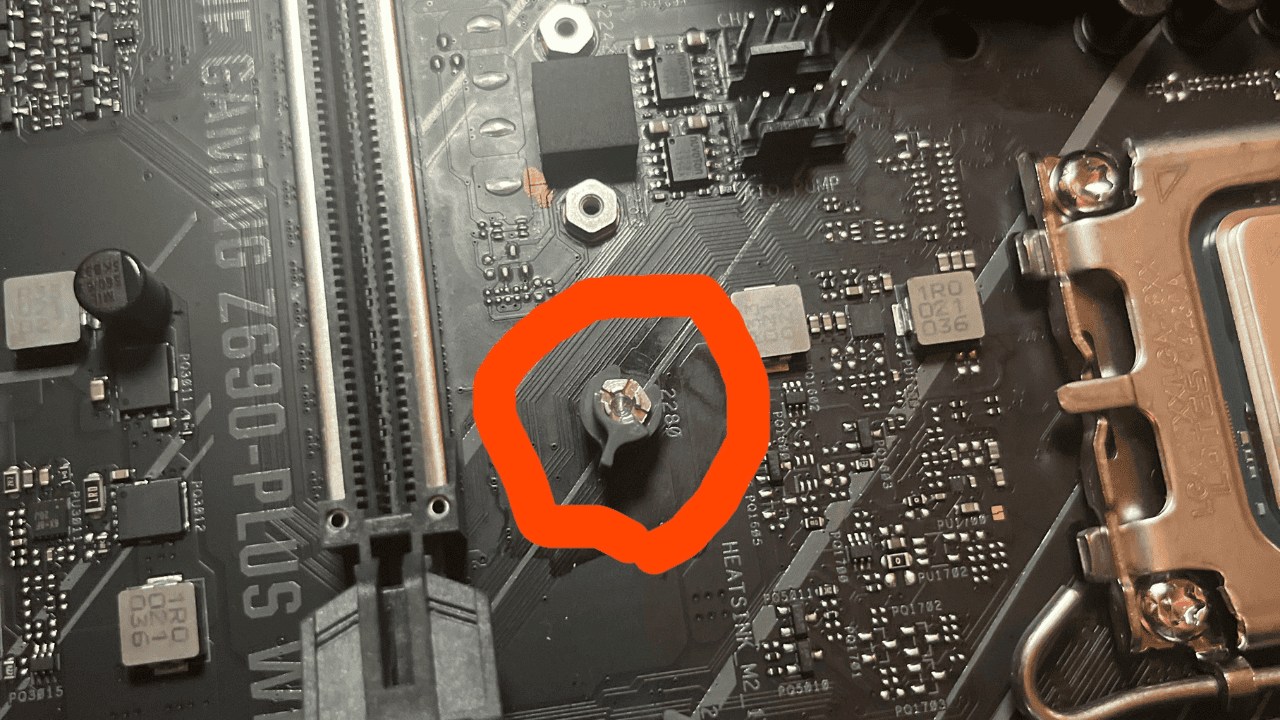
Step 2: Open up the computer’s case and look for the M.2 hole. Depending on your chip, the M.2 slot could be in the front or the back. Check your motherboard’s directions to find the right spot.
Step 3: Slide the M.2 SSD into place. Put the holes in the M.2 SSD into the slots in the M.2 drive. As you put the drive in, apply even pressure to it to make sure it stays in place.
Step 4: Use the screw that came with the M.2 SSD to hold it in place. Use the right screw to carefully put the M.2 SSD in place. Be careful not to overtighten, because that could damage the drive or the processor.
Step 5: Put the computer back together and hook up the power cord. After closing the M.2 SSD, close the PC case and make sure that all connections are secure. As soon as you plug in the power cord, you can use your computer.
Configuring BIOS and Initializing the Drive
After putting the M.2 SSD straight, you may need to change the BIOS settings and turn on the drive. Here’s how:
Step 1: Go to the BIOS page first. You have to restart your computer and press the key you were told to press during boot-up to get to the BIOS. Depending on who made your computer, you might be able to get into the BIOS by hitting Del, F2, or F10. If you’re not sure, look at the directions that came with your computer.
Step 2: Go where it says Storage or Boot. Use the arrow keys to get to the Storage or Boot area once you’re in the BIOS. Look for options that have M.2 or NVMe drives.
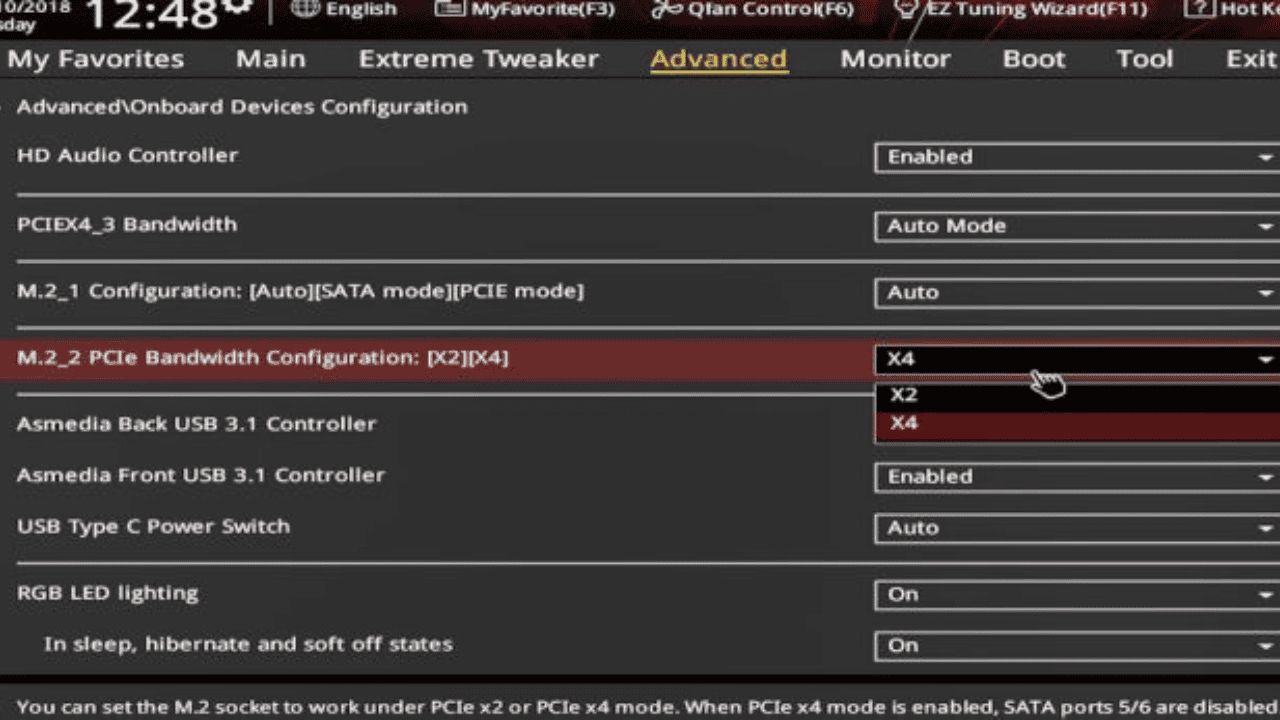
Step 3: Turn on the M.2 port and tell the computer to use it as the start drive. Find the M.2 slot in the Storage or Boot place where you will put the SSD. Turn it on, and make it the computer’s main drive that starts it up. This tells your system that the M.2 SSD is the main hard drive.
Step 4: Save the changes and exit the BIOS. Save your changes in the BIOS and then leave after making the necessary changes. Your computer will restart, and the M.2 SSD should now be visible to the system that is running.
Step 5: Show the operating system how to use the M.2 SSD. Once your computer is up and going, open the Disk Management tool in your operating system, such as Windows Disk Management. Find the M.2 SSD, which may look like it hasn’t been given or set up yet. To set up the drive, right-click on it and choose “Initialize” from the menu. Choose the right partition style (MBR or GPT) and follow the steps on the screen to set up the drive.
Verifying the Installation
It’s important to check the M.2 SSD after starting it up to make sure it’s working right. Here are some things to do to make sure everything goes well:
Step 1: Check the drive’s condition. Open the Disk Management tool or its equivalent in your operating system and make sure that the M.2 SSD is listed as a healthy, recognized drive. Make sure the right amount of storage room is shown.
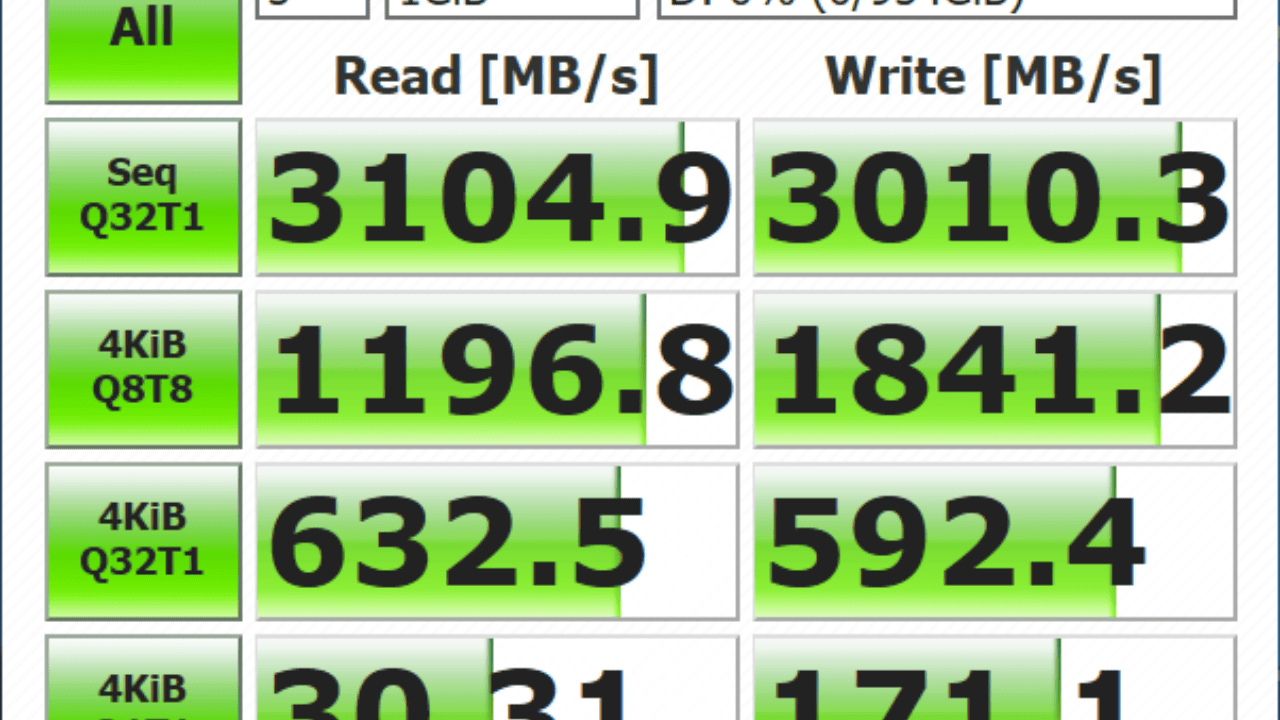
Step 2: Time it to see how fast it goes. You can check the speed of your new M.2 SSD and see how well it works with testing tools. This will tell you important things about how quickly your drive can read and write, so you can compare its speed to that of other storage devices.
Step 3: Move the files around and make sure they all work. Copy some files to the M.2 SSD to make sure they can be read and written correctly. Make sure everything works well and quickly by opening and using these files.
Conclusion
Congratulations! Putting an M.2 SSD in your PC was the right thing to do. If you follow this detailed guide, you’ll be able to find your information faster and make your system run better. When adding gear, you should always read your motherboard’s instructions and follow them.
If you want to store more of the data and move it faster, an M.2 SSD is a good choice. The M.2 SSD is a great addition to any modern PC because it is small and works well.
Go to https://trendblog.net to use helpful tools and learn more about PC gear, changes, and fixing problems. Our detailed tips and advice from experts will help you stay up-to-date and make the most of your computer time. To read more content like this, visit https://www.trendblog.net.