


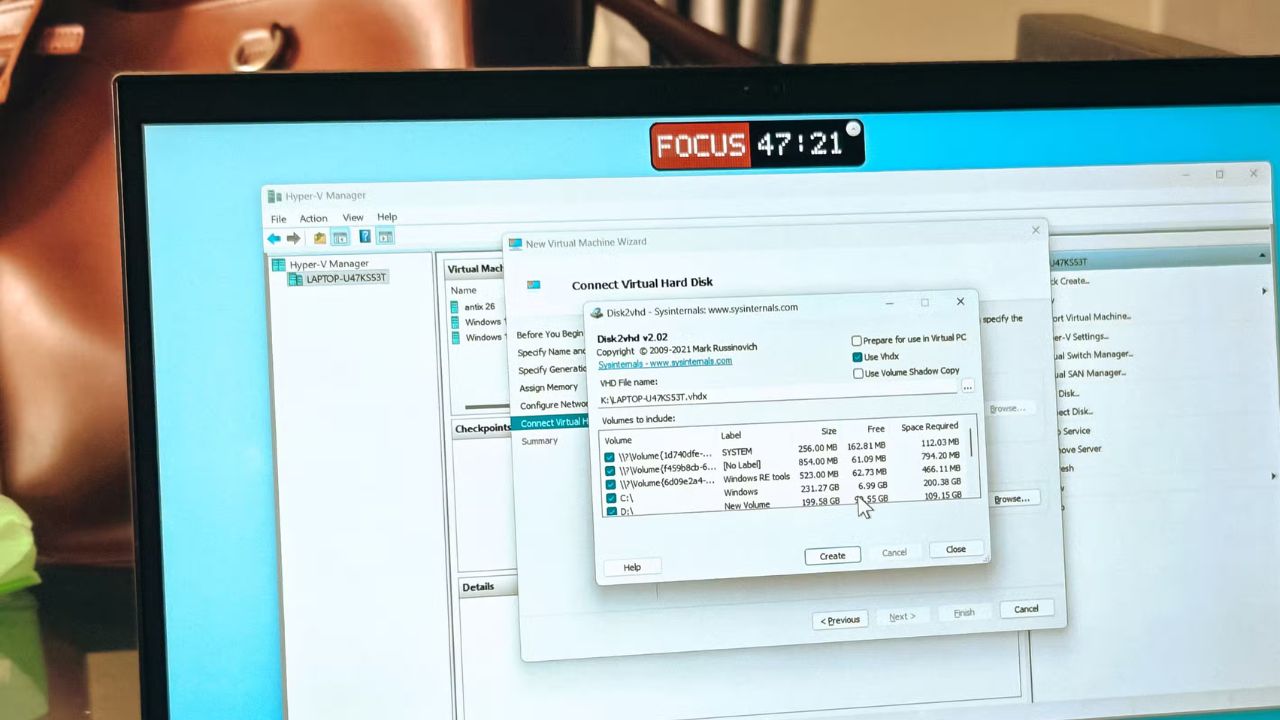
You can run your old Windows PC installation on your new machine by converting its hard drive into a virtual disk file. This process requires Windows 10 or Windows 11 on your new PC for Hyper-V, or any version for VirtualBox.
Table of Contents
Key Facts About Running an Old Windows Installation
- Convert your old hard drive to a virtual disk file (VHDX or VHD) to run it on your new PC.
- Use Microsoft’s Disk2VHD utility to create the virtual disk file.
- Run the old OS within a resizable window using Hyper-V (Windows Pro, Enterprise, Education editions).
- Alternatively, use VirtualBox for virtualization on any Windows edition.
- For maximum performance, dual-boot your old Windows installation natively.
- The process takes approximately 20 minutes.
Get Started: Turn Your Old Hard Drive into a Virtual Disk
By converting your old hard drive into a virtual disk file, you can carry your entire previous Windows installation onto your new machine. This allows you to either dual-boot into it natively or run it in a resizable window alongside your new OS using Hyper-V, all without reinstalling anything.
The first step is turning your old PC’s hard drive into a virtual disk file. Disk2VHD is a free, portable utility from Microsoft’s Sysinternals suite that I use for this task. You do not need to install it; simply download, unzip, and run the version that matches your system (32-bit, 64-bit, or ARM).
Once launched, Disk2VHD lists all connected volumes and disks. You can select the volumes you want to include, typically the system partition, recovery partition, and your C drive.
Ensure you exclude any USB drives you are using solely as the destination for the output file. The Use VHDX checkbox determines the output format; VHDX is recommended for Hyper-V or native dual-booting due to its better performance.
Run Your Old OS in a Window with Hyper-V
Instead of rebooting every time you need something from your old setup, you can run it inside a window on your new PC using Hyper-V. This is Microsoft’s built-in virtualization tool.
Hyper-V is not enabled by default. Head to Control Panel > Programs > Turn Windows features on or off, check the Hyper-V box and its sub-items, then restart your PC. If you are on a Windows Home edition, you will need a workaround since Hyper-V is only available on Pro, Enterprise, and Education editions.
Once Hyper-V is enabled, open Hyper-V Manager and click New > Virtual Machine. Give it a name and choose a storage location, ideally the same folder where you copied the virtual disk file.
Select the generation (Generation 1 for legacy BIOS, Generation 2 for UEFI), match your old PC’s setup. Leave RAM at the default 4 GB and set the network to Default Switch. When asked about the hard disk, point it to your existing virtual disk file.
Alternative: Using VirtualBox for Virtualization
If you do not have a Pro or Enterprise edition of Windows, VirtualBox offers a solid free alternative for virtualization. The setup process is largely similar to using Hyper-V.
The primary difference with VirtualBox is an extra step: you need to install “guest additions” after the operating system boots up. These guest additions unlock proper screen scaling, clipboard sharing, and drag-and-drop functionality between your host and guest systems.
Dual-Booting Your Old Windows Installation
Running the old OS in a virtual machine is convenient but incurs some performance overhead. If you require your old setup running at full speed, native dual-booting is the preferred method. This lets you choose between your old and new operating systems at startup, with the old OS running directly on the hardware.
Copy the virtual disk file from your USB drive onto your new PC’s C drive, ideally into a dedicated folder like ‘VHDX’. Once copied, right-click the file and select Mount. Windows will treat it like an actual attached disk and assign it a drive letter.
The final step is creating a boot entry so Windows recognizes this virtual disk as bootable. Open an administrator Command Prompt and run: bcdboot E:\Windows.
Replace E with the drive letter Windows assigned when you mounted the file. A success message confirms the boot files were created. Restarting your PC will then present a boot menu.
Clean Up: Removing the Old OS Entry
To remove the old OS entry later, boot back into your primary Windows installation. Navigate to the VHDX folder and delete the virtual disk file. This frees up storage space and removes the old system’s files.
Next, open System Configuration by typing msconfig in the Run dialog (Windows key + R). Go to the Boot tab, select the old OS entry, and click Delete. A restart will clear the boot menu, returning your system to a single-boot configuration.
Frequently Asked Questions
What is the primary tool for creating a virtual disk file from an old hard drive?
Microsoft’s free, portable utility, Disk2VHD, is the primary tool used to convert your old PC’s hard drive into a virtual disk file. It is part of the Sysinternals suite and does not require installation.
What editions of Windows support Hyper-V?
Hyper-V is natively available on Windows Pro, Enterprise, and Education editions. Windows Home editions require a workaround to enable Hyper-V, or you can use an alternative like VirtualBox.
What is the main advantage of using VirtualBox over Hyper-V?
VirtualBox’s main advantage is its availability across all Windows editions, including Home. It also offers similar features to Hyper-V and is a free, robust alternative for virtualization.
How can I distinguish drives when dual-booting?
After dual-booting, your C drive on the virtual system will correspond to the old OS, while your physical Windows 11 disk will show under a different letter. Renaming these drives in Disk Management can help prevent confusion.
What should I do if the dual-boot entry doesn’t appear after creating the boot entry?
If the dual-boot entry does not appear, ensure you ran the bcdboot command from an administrator Command Prompt. Also, verify that the drive letter specified in the command correctly matches the letter assigned to your mounted virtual disk file.
