Let us know, how to delete a page in word. You don’t want blank pages in the middle of your work or excess pages at the end if you’re using Microsoft Word. Tables, repeatedly pressing the ENTER key, superfluous section breaks, inadvertent page breaks, extra paragraph markers, and other factors may result in extra pages.
Because you don’t want your Word document to appear unprofessional as a result of this oddity, I’ll show you how to eliminate blank and additional pages in Word in this post. In this video, I’ll be using Microsoft Office 2016, but you may follow along with any version because the concepts are the same.
Table of Contents
How to delete a page in word
- To remove text, pictures, or empty paragraphs from a page, select the content you want to remove and press Delete. You can also perform the following:
- It’s a good idea to check for blank pages and an extra final page when dealing with a large word document that you’re preparing to show or print.
- To do so, press CTRL + SHIFT + 8 or select the paragraph symbol on the Home tab.
- When you press the ENTER key, paragraph markers () appear at the conclusion of each paragraph and each blank line — basically, whenever you hit the ENTER key, and at the start of the extra blank page.
- To get rid of the additional pages, use your mouse or trackpad to select the paragraph markers and then press the DELETE button. If one of the markers remains, use the BACKSPACE key to erase it.
- If you have the patience, you can also remove the blank page(s) by going to them and pressing the BACKSPACE key until the paragraph markers vanish.
Windows:
- Press Ctrl+G while clicking or tapping anywhere on the page you wish to erase.
- Type page in the Enter page number box.
- Select Close after pressing Enter on your keyboard.
- Verify that a content page is selected, then press the Delete key on your keyboard.
- macOS: To erase a page, click or tap anywhere on it, then hit Option++G.
- Type page in the Enter page number box.
- Select Close after pressing Enter on your keyboard.
- Verify that a content page is selected, then press the Delete key on your keyboard.
In a Word document, how do you delete an extra blank page?
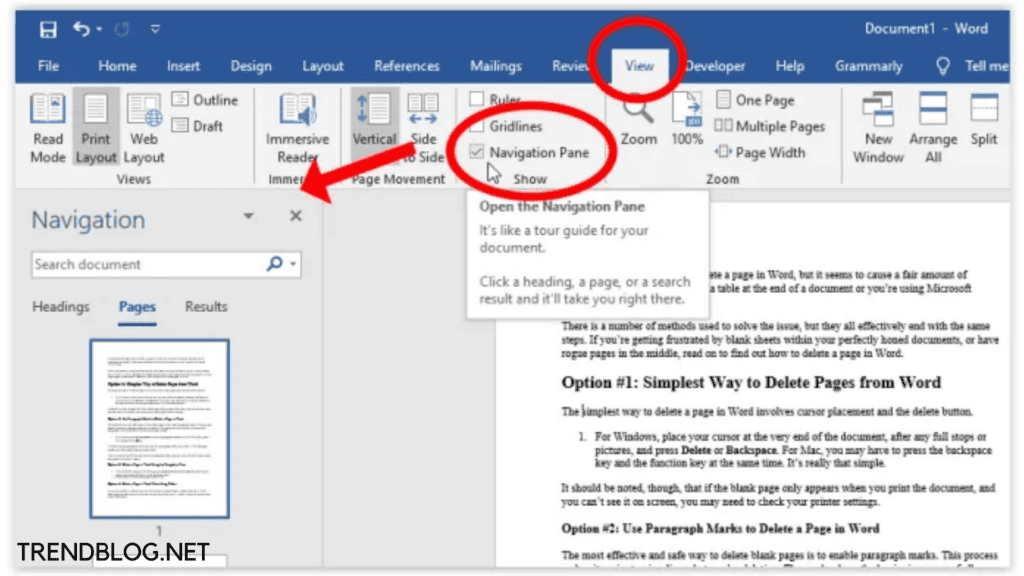
Step 1: Select the View tab to remove an extra blank page that may have been inserted at the conclusion of your document.
Step 2: Select the Navigation Pane from the drop-down menu. This opens a sidebar with three tabs: Headings, Pages, and Results. In the sidebar, click Pages to see all of the document’s pages.
Step 3: The current page will be selected automatically. To delete the extra blank page, select it with your mouse and press the DELETE key on your keyboard.
By hitting the BACKSPACE key, you can also delete the extra blank page.
Also read:
Let us Know How to Take Screenshots in Laptop From Windows to Mac
How Do you Root an Android Device: Why There is Need of Rooting
How to Deactivate Facebook: Disable: Delete: using Simple Tricks
Guide for How to Cancel Youtube Tv Using Android, iPhone, Computer
FAQs:
Q1. In Word, how can I erase an excess page?
To delete the extra blank page, select it with your mouse and press the DELETE key on your keyboard. By hitting the BACKSPACE key, you can also delete the extra blank page.
Q2. Is it possible to delete a blank page in Word?
Examine the formatting marks as you scroll through your manuscript. Hopefully, you’ll find the Page Break formatting mark surrounding the blank page you want to erase. To eliminate the blank page, simply highlight the formatting mark and use the delete/backspace key.
Q3. In Word, why can’t I erase a page?
In Microsoft Word, you must erase all of the text on a page before it may be deleted. Make sure there aren’t any invisible formatting marks on a page with no text that won’t go away.
Q4.How can I delete a page that won’t delete in Word?
A manual page break in your document may result in an unexpected blank page. Switch to showing paragraph markings to view manual page breaks: Press Ctrl+Shift+8 (Mac: +8). You can now pick and erase the page break.
You learnt how to eliminate blank pages in Word in this post to make your papers look more professional. Thank you for taking the time to read this. Please share this post with your friends and family if you find it useful.


Comments are closed.