


How to enable secure boot in asus bios, there is a chance that this will happen if we try to install Windows 11 or if we use Microsoft PC Health Check or other third-party applications to determine if the current computer is capable of running Windows 11 “It’s impossible to install Windows 11 on this machine. The computer needs to have Secure Boot functionality.” How does Secure Boot work? The PC must support the Secure Boot error: how can I resolve it?
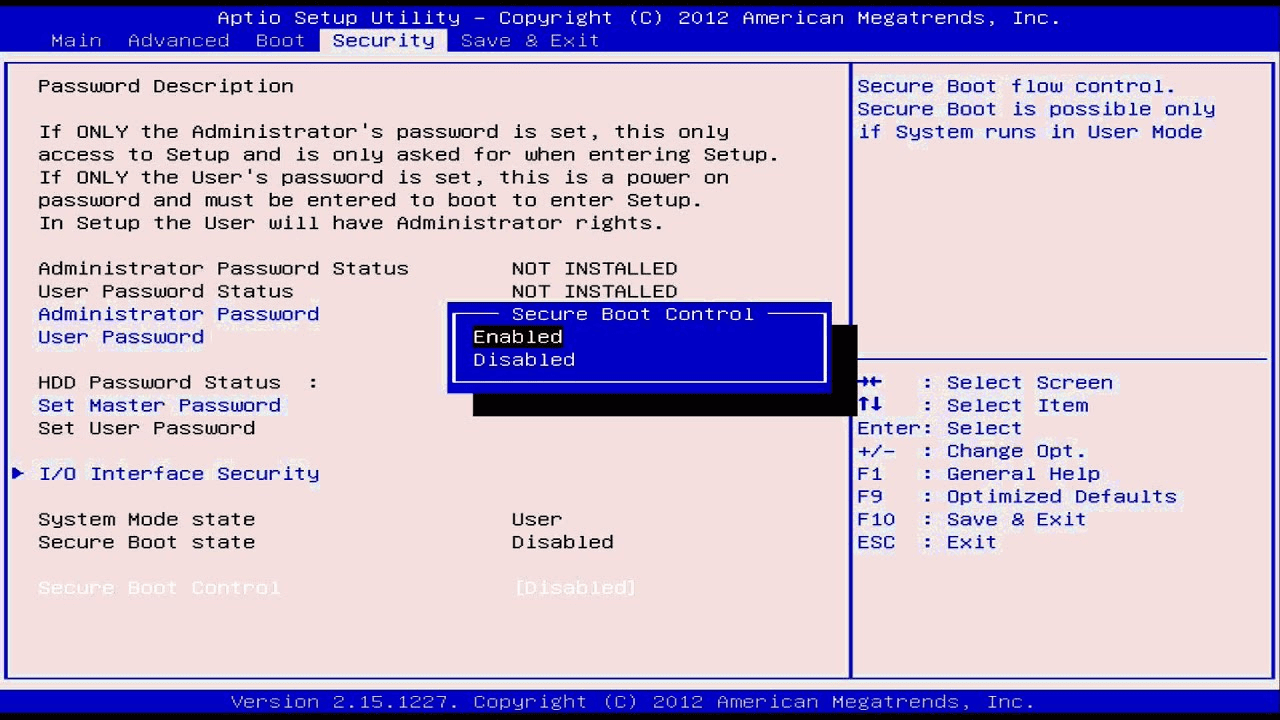
Table of Contents
How to Enable Secure Boot?
Through the motherboard’s BIOS, we may activate Secure Boot. The process of enabling Secure Boot varies slightly between different motherboard and computer manufacturers. In this article, we’ll demonstrate how to activate Secure Boot on MSI and ASUS motherboards, as well as Lenovo, Dell, and HP laptops. If you’re using a different brand of computer or motherboard, look for the relevant information in the motherboard’s user manual, get in touch with the motherboard maker, or do a web search on Google or Bing. You can use latest AI options like ChatGPT or Bing Ai etc. to get a quick answer.
How to Enable Secure Boot in Asus BIOS?
If your BIOS Mode is set to CSM, you need to switch it to UEFI first. You can use the BIOS to get to the Secure Boot options if the BIOS mode is UEFI.
- Start your computer.
- To get into the BIOS, keep pressing the BIOS key over and again. Most of the time, the Delete key on an MSI motherboard is the BIOS key.
- The BIOS key on a laptop may also be one of the Function keys.
- To get into EZ Mode, press F7.
- When you click Settings, choose Advanced.
- Select Set up Windows OS.
- Set UEFI in BIOS UEFI/CSM Mode.
- Press F10 and then click Yes.
- Restart your PC.
How to Enable Secure Boot on MSI Motherboard?
To enable the secure boot in MSI follow these steps:
- Use DEL or F2 on your computer to get to the UEFI BIOS.
- To switch to Advanced Mode, press F7.
- In your UEFI, go to Advanced Boot Menu > Boot > Secure Boot.
- Change the OS Type to “Other OS” by looking for the “OS Type” option.
- You can save your changes and turn the computer back on by pressing the F10 key.
- Repeat steps 1 and 2, and make sure that your computer’s Platform Key (PK) State is now “Unloaded.”
- Leave UEFI and let the computer start up on its own.
Now, the computer should start up normally, and you shouldn’t get any “Secure Boot Violation” error messages.
How to Enable Secure Boot on Lenovo Laptops?
- To turn the system on, press the Power button.
- When the logo appears, keep tapping the F1 key until the BIOS Setup menu appears.
- Go to the “Security” tab and click “Secure Boot” from there.
- Go to the menu item that says “Secure Boot.”
- In the Secure Boot entry, press Enter to choose “Enabled” or “Disabled” to turn on or turn off the Secure Boot function.
- Press F10 to save changes to the BIOS.
- Start the machine up again.
How to Enable Secure Boot on Dell laptops?
Secure Boot is run by the computer’s firmware (BIOS) and can be turned on in a few easy steps:
- Start your computer.
- Tap the F2 key when the Dell logo appears to get into the BIOS.
Depending on what kind of computer you have, the next steps will be:
If you use OptiPlex, Precision, Wyse, and XPS your next steps should be,
- Select Secure Boot >> Put Secure Boot on >> Check to see if Secure Boot is on.

- Click “Apply,” then “Exit,” and finally “Save.”
- The computer will start up again and go back to the Windows desktop.
If you have Alienware, Inspiron or Vostro the steps are,
- Click on Secure Boot >> Set “Enabled” for the Secure Boot setting.

- Press the F10 key to save and leave.
How to Enable Secure Boot on HP Laptops?
If you want your computer to start up from a USB or CD/DVD drive, you must turn off the secure boot option. If you want Windows 8 to start up correctly, you must turn on secure boot.
- Turn on your HP laptop and keep pressing the F10 key until the Computer Setup Utility program starts.
- Press the arrow key to get to the Security menu, use the Up and Down keys to choose Secure Boot Configuration, and then press Enter.
- When you see a message about Secure Boot Configuration, press F10 to keep going.
- You can use the up and down arrow keys to choose Secure Boot, and then the left and right arrow keys to change the setting to Disable or Enable.
- You can do the same thing to turn off or turn on Legacy Support.
- To save the changes, press F10.

Frequently Asked Question’s:
Why is secure boot disabled?
Before an OS can be installed, Secure Boot must be turned on. In the event that Secure Boot was disabled during an OS installation, that OS will not be Secure Boot-compatible, and a fresh OS installation will be necessary. It is important to use a latest UEFI version if you want to use Secure Boot.
Is secure boot enabled by default?
Secure Boot is enabled by default on modern PCs that came preinstalled with Windows 8, 10 or later. System security is improved, but you may have to turn it off if you want to use Linux or an older version of Windows.
Comments are closed.