


Many people use Google Chrome as their browser because it is fast and works well. But just like any other tool, it can have bugs that make it less useful. People who use Chrome often run into the “Out of Memory” trouble. This goes wrong when Chrome uses up all the memory on your computer.
This can slow Chrome down or even cause it to crash. If you are having this annoying problem, don’t worry. We’ll show you a few good ways to fix the “out of memory” problem in Google Chrome in this article.
Table of Contents
How to Fix Google Chrome’s Out-of-Memory Error?
Google Chrome’s “out of memory” error can be annoying, but it is not a rare problem. You can fix this problem and make Chrome work better by doing a few things. In the parts that follow, we’ll talk about these solutions in more detail. This will help you fix the “out of memory” problem so you can browse the web smoothly.
Clearing Cache and Cookies
One of the first things to do to fix the “out of memory” message is to clear Chrome’s cache and cookies. Over time, these temporary files can add up and take up memory room that could be used for other things. To clear the cache and cookies, do the following:
- To get to the menu, open Google Chrome and click on the three dots in the top right corner.
- Select “Settings” from the drop-down menu.
- Scroll down and click “Privacy and security” in the menu on the left.
- In the “Privacy and Security” section, click on “Clear browsing data.”
- In the box that pops up, choose how long you want the data to be erased. It’s best to choose “All time” to make sure of a full cleanup.
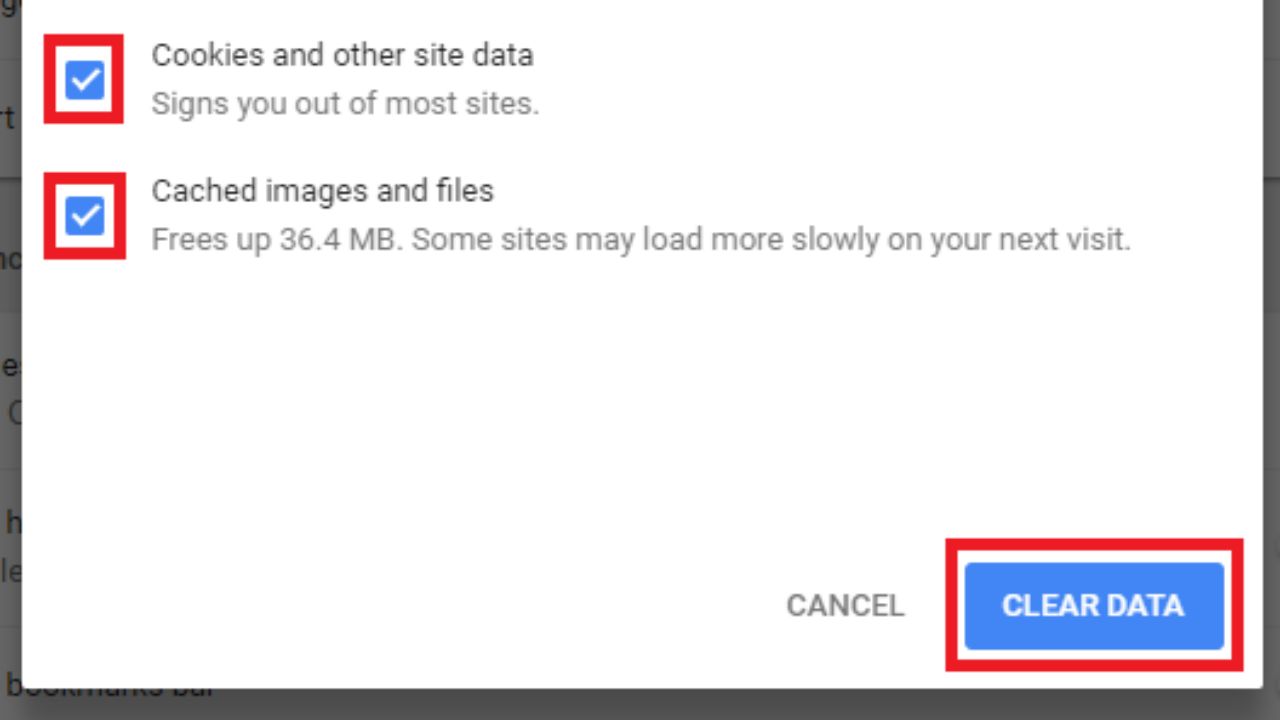
- Check the boxes next to “Browsing history,” “Cookies and other site data,” and “Cached images and files.”
- To get rid of the things you’ve picked, click the “Clear data” button.
- Clearing the cache and cookies can make room for more memory and may fix the “out of memory” problem.
Disabling Extensions and Plugins
Chrome can work better with extensions and plugins, but they may also use more memory. You can fix the “out of memory” error by turning off apps that you don’t need or that are causing problems. To turn off Chrome’s plug-ins and add-ons, do the following:
- In Google Chrome, type “chrome://extensions” into the search bar.
- Press Enter to go to the Extensions page.
- If you don’t need an extension or think it might be causing the memory problem, you can turn it off by flipping the switch next to it.

- Type “chrome://plugins” into the address bar and press Enter to go to the Plugins page.
- Close any apps you don’t need or that are giving you trouble.
- By turning off extensions and plugins, you can reduce the amount of memory being used and maybe fix the “out of memory” problem.
Updating Chrome and System Drivers
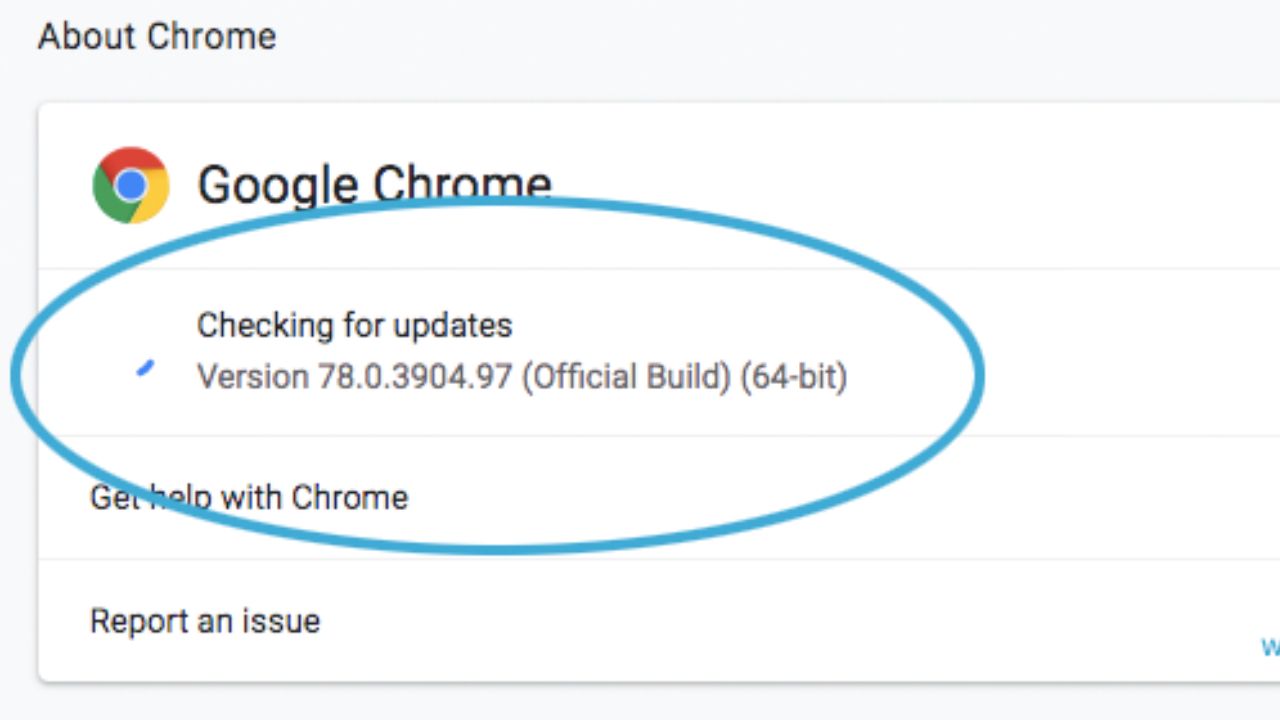
For the best results, you should always have the latest versions of Chrome and your system drivers. Outdated software might not work well with other programs, which can cause memory problems. To keep Chrome and system tools up-to-date, do the following:
- To get to the menu, open Google Chrome and click on the three dots in the top right corner.
- Select “Settings” from the drop-down menu.
- Click the “About Chrome” link in the menu on the left as you scroll down.
- Chrome will automatically check for updates and install them if there are any. If asked, start the browser over again.
- Go to the manufacturer’s website or use a trusted driver update tool to make sure that all system drivers are up to date.
- By updating Chrome and the system drivers, you can fix memory problems and make the whole system more stable.
Adjusting Chrome’s Memory Settings
Google Chrome lets you change the memory settings, which gives the browser more resources. The “out of memory” mistake can be fixed by making the memory limit bigger. Do these things to change how much memory Chrome uses:
- In Google Chrome, type “chrome://flags” into the search bar.
- Press Enter to go to the page in Chrome where you can try out new features.
- Type “memory” into the search bar to narrow down the options.
- Find “Enable tab discarding” and disable it by clicking “Disabled.”
- Find “Proactive Tab Freeze and Discard” and disable it by clicking “Disabled.”
- You need to restart Chrome for the changes to take effect.
- If you change Chrome’s memory settings, you can improve how it uses memory and stop the “out of memory” error from happening.
Closing Unnecessary Tabs and Applications
When you have a lot of tabs and programs running, your computer has to work harder. If you close tabs and apps you don’t need, Chrome may be able to fix the “out of memory” problem. Close any tabs or apps you aren’t using right now to make the best use of memory.
Running Chrome Cleanup Tool
Chrome comes with a tool called Chrome Cleanup that can look for and get rid of useless software that could slow down the browser. To use the Chrome Cleanup Tool, do the following:
- To get to the menu, open Google Chrome and click on the three dots in the top right corner.
- Select “Settings” from the drop-down menu.
- Scroll down and click “Advanced” on the left-hand button.
- In the “Reset and clean up” section, click “Clean up computer.”

- Click the “Find” button to start the search.
- Follow the instructions on the screen to get rid of any bad software that is found.
- You can fix bugs and make Chrome run better by using the Chrome Cleanup Tool.
Increasing Virtual Memory
The page file is another name for virtual memory. It adds to the amount of real memory and can help fix memory problems. By increasing the amount of virtual memory, you give Chrome more of the tools it needs to work well. To add more virtual memory, do the following:
- Right-click on the button that says “This PC” or “My Computer” and choose “Properties.”
- In the System Properties box, click the “Advanced system settings” link.
- Go to the System Properties text box and click on the “Advanced” tab.
- In the “Performance” section, click the “Settings” button.
- Go to the Performance Options box and click on the “Advanced” tab.
- In the “Virtual memory” section, click “Change.”
- Uncheck the box that says “Automatically manage the size of the paging file for all drives.”
- Choose the drive where your operating system is kept, which is usually C:.
- Choose “Custom size” and put a bigger number for both the starting and maximum sizes of the paging file.
- Click “Set” and then “OK” for the changes to take effect.
- You need to restart your computer for the changes to take effect.
- By adding more virtual memory, Chrome can handle tasks that use a lot of memory and avoid the “out of memory” problem.
Resetting Chrome to Default Settings
If none of the other things you tried to fix the “out of memory” problem worked, you can reset Chrome to the way it was when it was first installed. This action will delete all options and preferences, but it may fix problems that are deeper down. Do these things to reset Chrome:
- To get to the menu, open Google Chrome and click on the three dots in the top right corner.
- Select “Settings” from the drop-down menu.
- Scroll down and click “Advanced” on the left-hand button.
- In the “Reset and clean up” section, click “Restore settings to their original defaults.”
- Click the “Reset settings” button in the confirmation box.

- By restarting Chrome, you can get rid of any settings or apps that are causing problems and could be the cause of the “out of memory” error.
Conclusion
Google Chrome’s “out of memory” mistake can be annoying, but if you know what to do, you can fix it. In this article, we talked about how to fix the “out of memory” problem in Chrome.
By clearing cache and cookies, turning off extensions, updating Chrome and system drivers, changing memory settings, closing unnecessary tabs, running the Chrome Cleanup Tool, checking for malware, increasing virtual memory, resetting Chrome, and optimizing system performance, you can improve Chrome’s performance and have a smoother browsing experience.
To read more content like this, visit https://www.trendblog.net.