Back To Top

 How to Take a Screenshot on Windows 10 Using shortcut Keys and Snipping Tools

How to Take a Screenshot on Windows 10 Using shortcut Keys and Snipping Tools

How to take a screenshot on windows 10? There are various options in Windows 10 for taking screenshots of your full computer screen or just selected areas of it. The “PrtScn” button on your keyboard is the quickest way to take a screenshot in Windows 10. To take screenshots of sections of the screen, you can use a variety of key combinations. Microsoft also includes a Snipping Tool that allows you to customise screenshots and doodle on them. By using the Windows + G keyboard shortcut while playing a game, you can take screenshots. If you need to capture a snapshot of something on your computer screen, Windows 10 provides a number of options.

Whether you want to preserve the full screen or just a portion of it, we’ve compiled a list of the most frequent methods for capturing a screenshot in Windows 10.

screenshot on windows 10

How to use the PrtScn key in Windows 10 to snap a screenshot

Simply hit the “Print Screen” key on your keyboard to save a copy of whatever is now on your computer screen. It’s commonly called “PrtScn” (or something similar) and can be found in the top row, next to or among the Function keys.

You may need to use the Function key on some keyboards (especially laptops) to activate Print Screen (in other words, hold the Function key and then press PrtScn).

There are multiple PrtScn variants on Windows:

PrtScn should be pressed. The full screen gets copied to the clipboard. You can paste the screenshot into any image-viewing tool, such as Paint or Microsoft Word.

Press Alt + PrtScn at the same time. The active window is copied to the clipboard, which you can then paste into another programme.

Hold down the Windows key while pressing Shift + S. The mouse pointer will change and the screen will fade. You can select an area of the screen to capture by dragging. You can paste the screenshot into another programme after it has been copied to the clipboard. (This shortcut only works if you have the most recent version of Windows 10, known as the Windows 10 Creators Update, installed.)

Press the Windows key + PrtScn at the same time. The full screen is saved as an image file. It’s under a subdirectory called “Screenshots” under the “Pictures” folder.

How to use Snipping Tool on Windows 10 to snap a screenshot

With Windows 10, Microsoft offers Snipping Tool, a far more flexible screenshot application.

You can take a screenshot with Snipping Tool and save it as an image file without first pasting it into another programme.

  1. From the Start menu, select Snipping Tool.
  2. Select the type of screenshot shape you want from the “Mode” drop-down menu, which includes full-screen, rectangle, and free-form options.
  3. When you click New, your screen will go black. The screenshot can then be created with the mouse. In the Snipping Tool window, the screenshot will display.
  4. If you want to add something like a tooltip that appears only after a mouse movement, you may use the Delay menu to determine how long to wait before capturing the screenshot.
  5. After you’ve taken your snapshot, you can annotate it with the sketching tools if you want to.
  6. When you’re finished, go to “File” and then “Save As” to save the screenshot to your computer.
  7. You may also copy the image to your clipboard by clicking the copy button in the Snipping Tool window, which appears like two pages stacked on top of each other.

screenshot on windows 10

How to use the Game Bar in Windows 10 to snap a screenshot

The Game Bar is a screenshot and video recording overlay that you may use in most Windows games. Here’s how to put it to use:

  1. From the Start menu or the Xbox Console Companion software, start a game.
  2. Press the Windows key + G while playing the game. The Game Bar overlay should now be visible.
  3. To take a screenshot, click the camera icon or use the keyboard shortcut Windows key + Alt + PrtScn.

The snapshot will be stored to a subfolder called “Captures” in the “Videos” folder.

If you’re playing a game on Steam, you can also capture a screenshot by pressing F11. It will be saved to your Steam screenshots folder.

shortcut keys screenshot on windows 10

Also read:

Guide for How to Cancel Youtube Tv Using Android, iPhone, Computer

How to Make Mac Dark Mode: Make Apps and Features Interact Dark Mode

How to Hide Amazon Orders: Element of Surprise Your Orders: 2022 Updated

All About iPhone 14 From Body Design, Camera Technology to Crash and WiFi Detections

FAQs:

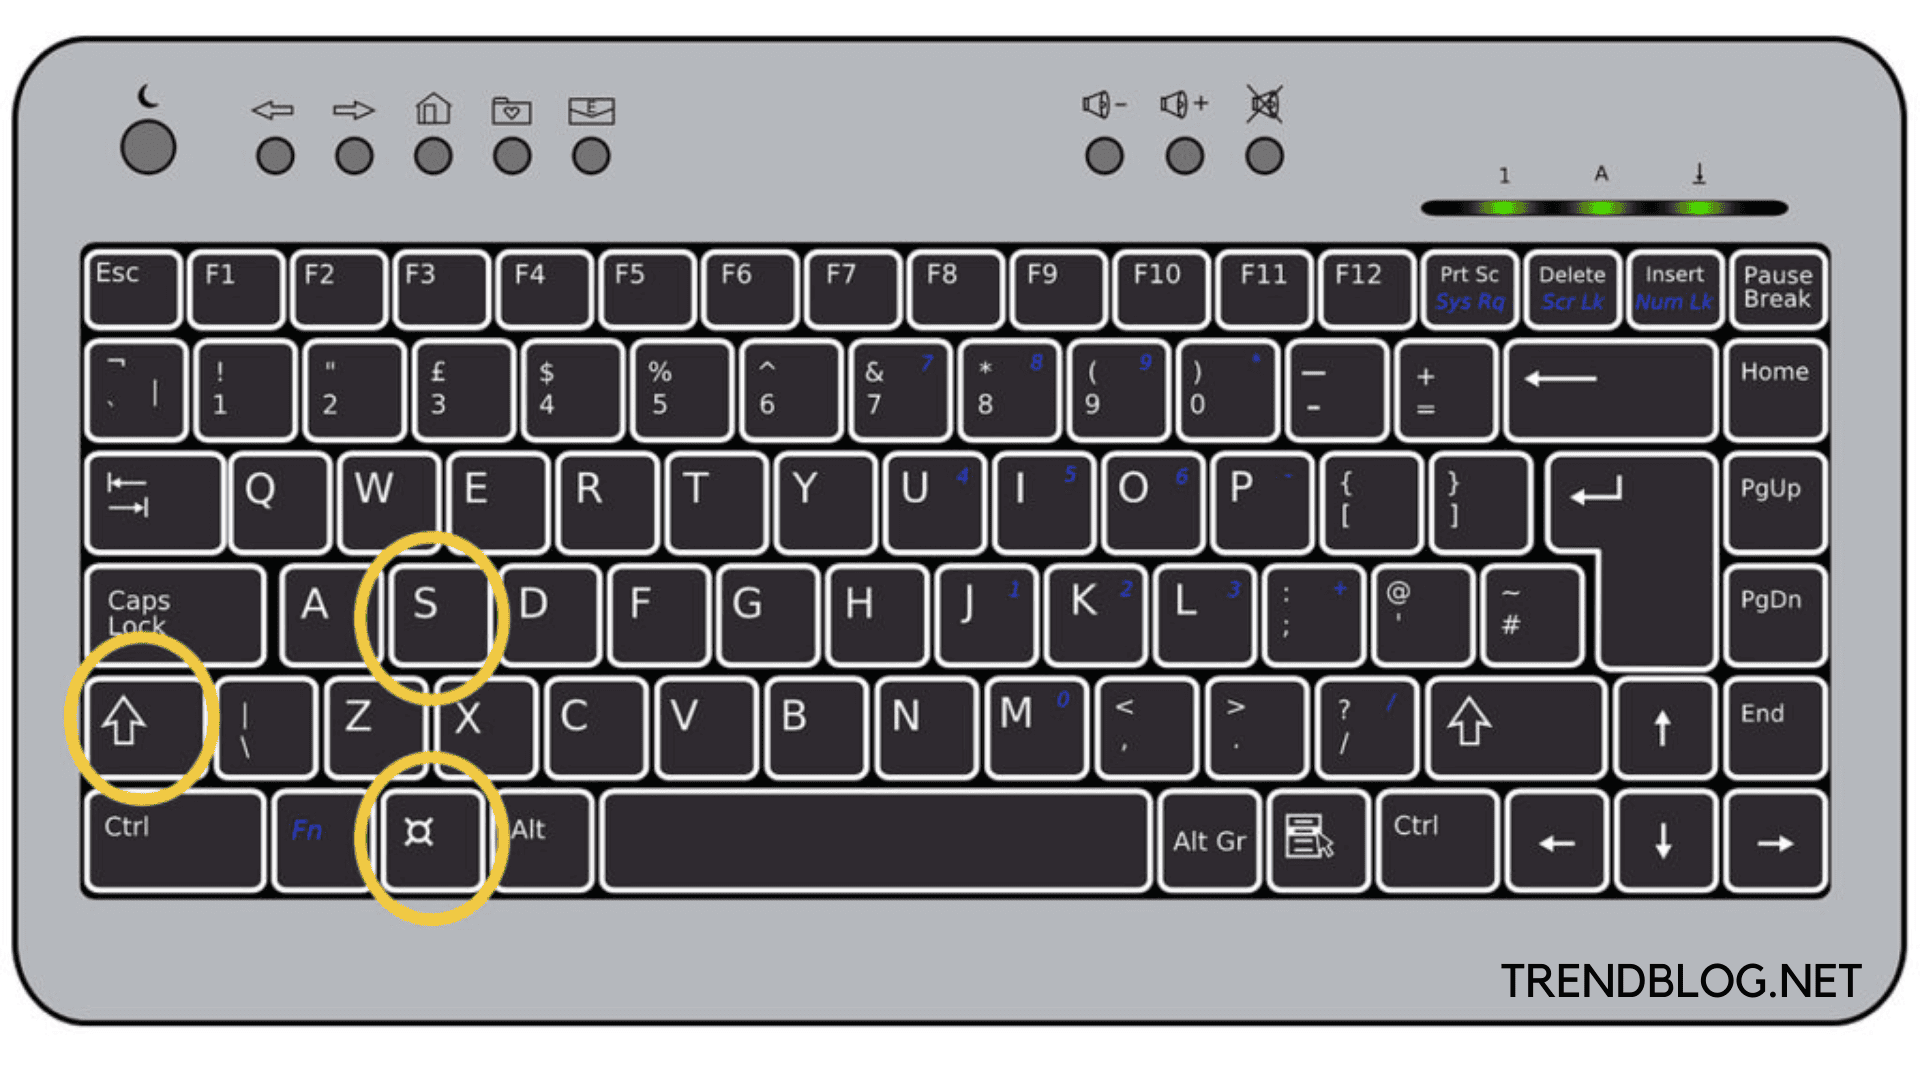
Q1: On my laptop, how can I snap a custom screenshot?

Ctrl + PrtScn are the keys to use. The entire screen, including the open menu, turns grey. Select Mode, or select the arrow adjacent to the New button in prior versions of Windows. Choose the type of snip you want, then the portion of the screen capture you wish to capture.

Q2: Can I take a screenshot?

To capture a screenshot on Android, tap and hold the Power button until the menu appears, then select Screenshot. If the programme does not impose a screenshot restriction, the image is saved to Device > Pictures > Screenshots by default.

Q3: What is the best way to snap a screenshot without asking permission?

Making use of Google Assistant

Open the app that won’t let you take a screenshot.

To use Google Assistant, press and hold the Home button or slide up from the bottom left or right corner.

Select What’s on my Screen? from the drop-down menu. You can type it or say it if it doesn’t appear.

Then, on the Share screenshot icon, press.

Q4: Is it possible to take a screenshot because of a security policy?

An organisation or the phone manufacturer may have placed a restriction on taking screenshots: If you’re using an Android smartphone provided by your employer or school, it might have a device- or account-based restriction that prevents you from taking screenshots for security reasons.

Cleo Hall

Cleo Hall

Cleo Hall is a tech writer for Trendblog.net, sharing informative articles on the latest tech trends and advancements. With a passion for technology, he aims to educate and inspire others.
Prev Post

Guide for How to Cancel Youtube Tv Using Android, iPhone, Computer

Next Post

Steps to Open Apk File: What is Inside Apk File

post-bars
 How To Take A Screenshot On Windows 10?

How To Take A Screenshot On Windows 10?

At least once, you must have been in a situation that you need to screenshot your screen. Whether to save something, to edit the image, or to communicate with any type of support and describe the issue better. Whatever the reason is, it’s important to know that there are several ways to take a screenshot on Windows 10. The method you’ll choose mostly depends on the reason you need to take a screenshot in the first place.

For example, if you need to edit something, the best way is to use Paint. If you want to save a file, you can make a screenshot directly to OneDrive.

In this article, we will go together through several useful methods to take a screenshot on your Windows 10, and you can decide what’s the most suitable for you.

Windows methods to take a screenshot

Here, we will go through the most basic ways of taking a screenshot of your Desktop. Windows gives you six ways to do so using your keyboard. The method will mostly depend on the device you’re using and whether it’s a laptop or a PC.

  1. For the start, find on your keyboard button “Print Screen” – “PrtSc” or “PrtScn.” Using this button, you’ll be able to capture a screenshot of your entire desktop, all the displays you have opened. It’s important to note that your screenshot will not be immediately saved, but it will be sent to the clipboard. From there, you can further rotate and crop the image and save the final result.
Take A Screenshot On Windows 10
  1. Another method to capture your screen is to use “Alt” + “PrtScn”. This way you’ll capture only a part of your desktop, meaning only one file, browser picture, etc. Make sure to first highlight the window you want to capture and then press these two buttons simultaneously. Again, the picture will not be automatically saved, it’ll show in your clipboard where you can save it or edit it if needed.
  2. If you want to capture the entire screen and save it without editing, you can use “Win” + “PrtScn”. Here, “Win” stands for the “Windows” button that most likely looks like the Windows logo on your keyboard and is placed on the left side from the “Space” button.

Your picture will be automatically saved to C:Users<user name>Pictures>Screenshots.

Take A Screenshot On Windows 10
  1. “Win” + “Shift” + “S” is yet another useful way to take a screenshot of your display. These commands will redirect you to the built-in Windows tool Snip & Sketch. You will see a small bar giving you 4 options – Rectangular Snip, Freeform Snip, Window Snip, and a Fullscreen Snip. The picture will be saved in the clipboard where you can crop, edit, and save it.
Take A Screenshot On Windows 10
  1. If you want to take a screenshot from the Xbox Game Bar, press “Win” + “G”. Click the capture button and press the camera icon. Your picture will be automatically saved to C:Users<user name>Videos>Captures.
  2. If you want to capture an active Windows display, you can use “Win” + “Alt” + “PrtScn”. The picture will be automatically saved to C:Users<user name>Videos>Captures.

In case you are using OneDrive, you can save all of your screenshots to a cloud. That way, you’ll be sure you won’t lose them and will have the access to pictures any time from any device. For the screenshots to be saved to your cloud, follow these steps.

  1. Log in to the “OneDrive” app
  2. Click on the “Cloud” icon
  3. Select “Help & Settings”
  4. Click “Settings” > “Backup”
  5. Check the box related to Screenshots
Take A Screenshot On Windows 10
  1. Press “OK”

Now, all of your screenshots will be saved to a cloud instead of disk C.

Using Paint for screenshots

As mentioned, after capturing your display, you can edit a picture, crop it, rotate it, anything you need before the final saving. If your picture is in the clipboard, you can press “Edit” and choose to edit it via Paint, Paint 3D, or Photos. Another way is to copy the picture from the clipboard and paste it into the Paint app. If the picture has been automatically saved, you can go right-click on the picture, click “Open with” and choose Paint.

Take A Screenshot On Windows 10

Saving the screenshot after editing

Now when your picture is edited, it’s ready to be saved. Click on “File” > “Save As”. You’ll be able to choose the type of the file – PNG, JPEG, GIF, BMP. Now choose where would you like to save the picture and under which name. If you do not want a file to be saved in the default location, you can choose a specific place, such as any folder or Desktop. When you’re all set, press on “Save”.

Using Snipping Tool for taking a screenshot on the Windows 10

An alternative tool to Windows options for taking a screenshot is a Snipping Tool. It’s a preinstalled tool every device using Windows 10 has. It’s simple to use and you can edit your photos before saving them.

Go to the search bar next to the “Start” button and type “Snipping Tool”. Click twice on the tool to open it. This tool is a good option to use when you need to screenshot a part of your screen only.

Once you open a Snipping tool, you’ll be able to see the “Mode” option on the top left corner. You will see a small bar giving you 4 options – Rectangular Snip, Free-form Snip, Window Snip, and a Full-screen Snip. Choose the mode that suits you the most. If you’re using the Rectangular Snip and the Free-form Snip, the screen will turn white. Once you choose the area you want to screenshot, this area of the screen will become visible, so you’ll be able to tell where exactly are the edges of your picture. If you’re using Window Snip, all the other windows will turn white except the one you are screenshotting.

Once you take a screenshot, you’ll have an option to edit your picture using Paint 3D. If you do not have anything to edit, you can click on “File” in the top right corner. You will see “Save as”. Name your picture and choose the destination to save it.

That’s it, your picture has been saved!

How to take a screenshot on Windows 10 using Google Chrome?

Here’s another thing you can try. If the picture you want to save is from your browser, you can try to take a screenshot directly in Google Chrome. Here is how.

  1. Open Google Chrome
  2. Press “Ctrl” + “Shift” + “I” if you’re using a PC. For Mac devices press “Command” + “Option” + “I”
  3. Press “Ctrl” + “Shift P” for PC or “Command” + “Shift P” for Mac
Take A Screenshot On Windows 10
  1. Type “screenshot” – the list of 4 screenshot types will appear
  2. Choose between – Capture area screenshot, Capture full-size screenshot, Capture node screenshot, or Capture screenshot*
Take A Screenshot On Windows 10
  1. Using the arrow on your keyboard scroll down, choose one type, and press enter
  2. Your screenshot will be taken and automatically saved.
  3. Look for the screenshot in Google Chrome’s download manager.

Once you do a screenshot through Google Chrome directly, you will not be able to see the borders of the browser, only the content itself.

*Capture area screenshot – Let you select a specific part of the screen and save it as a screenshot. If you choose this option, you’ll be able to drag a mouse to any area of your screen and choose what to screenshot.

*Capture full-size screenshot – by choosing this option, you’ll save an entire browser page from the top to bottom.

*Capture node screenshot – It lets you capture an image or a specific HTML element.

*Capture screenshot – saves an image of everything currently visible on your screen.

Now, after you know how to take a screenshot, you can easily use other alternative tools such as Snip & Sketch or Lightshot. It’s a third-party app allowing you to take a screenshot of your screen on any device – Windows or Mac. https://app.prntscr.com/en/index.html

If you have any other ideas on how to take a screenshot of your screen on Windows 10 easily, let us know in the comment below.

Editors’ Recommendation:

Cleo Hall

Cleo Hall

Cleo Hall is a tech writer for Trendblog.net, sharing informative articles on the latest tech trends and advancements. With a passion for technology, he aims to educate and inspire others.
Prev Post

How to stop pop up ads on Android

Next Post

How to install Windows on Mac – 2021

post-bars

Leave a Comment