


Clipchamp video editor in Windows 11, since Windows 11’s release in October 2021, this is the first big update. Changes to File Explorer and additional built-in programmes are only two examples of what’s new in Windows 11 2022 Update. Clipchamp, a video editor, is one such product that Microsoft purchased in 2021. It’s possible that you’ve seen Clipchamp on Windows 11 before, but now it’s included by default, and if you’re looking for a simple video editor, it’s a huge improvement over what Microsoft previously provided. But if you’re just starting out, video editing might be a real challenge. We’ll start with the fundamentals of Clipchamp’s use.
Due to Clipchamp being a web-based video editor, you can always use it even if you don’t have the app. However, the app may make it more convenient to get to. It’s worth noting that Clipchamp also offers a premium subscription, although most users likely won’t need it.
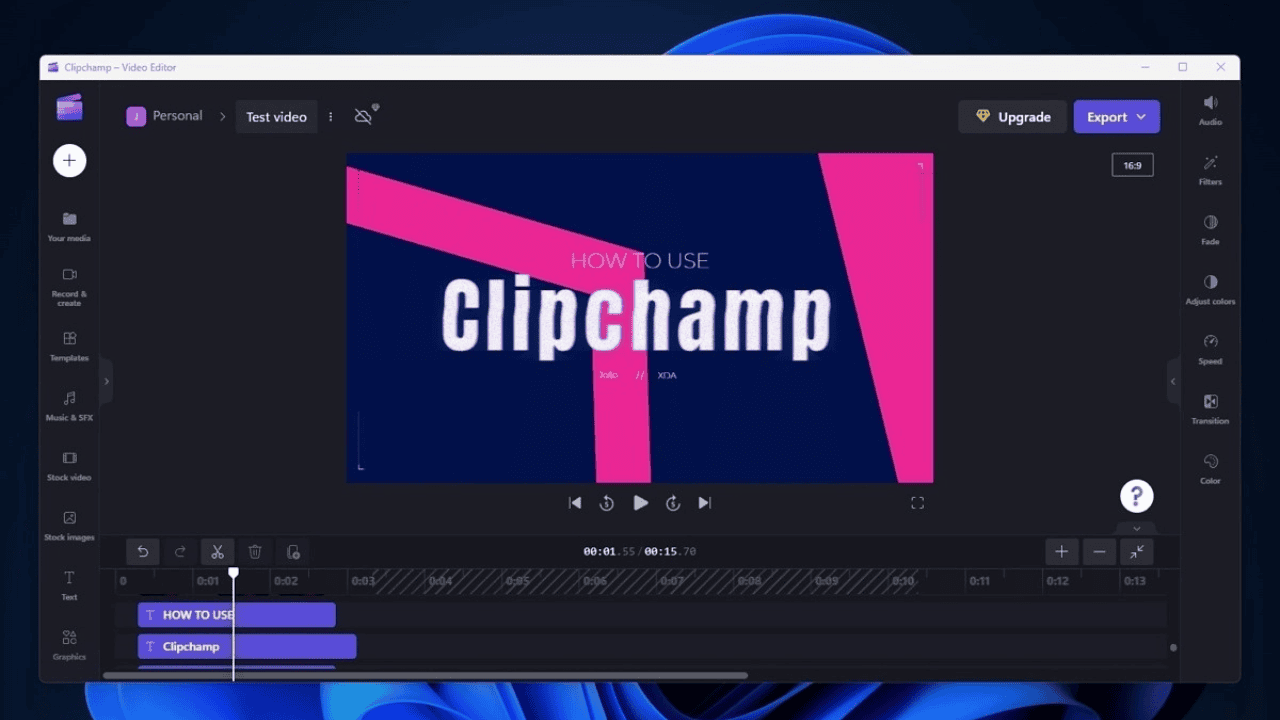
Table of Contents
Clipchamp plans
Up until recently, Clipchamp was available in a variety of pricing tiers, each of which was questionably worth the money. Clipchamp is now available for free, and the Essentials plan may be purchased for $11.99 per month or $119.99 per year, thanks to a recent price reduction by Microsoft.
All the essentials are there in the free plan. All of your own assets, as well as certain stock elements offered by Clipchamp, are available to you in this multi-track video editor. Not all of these are free, but a good number of them are. This restriction is shared with the Essentials plan and means that you can only export video in 1080p.
If you subscribe to the more expensive Essentials plan, however, you have access to a larger library of downloadable media files. If you plan on making movies frequently, you may find it useful to subscribe to the Essentials plan, which includes many of these assets as well as others. The Essentials plan also lets you upload custom fonts and use additional video filters. You can easily incorporate things like a colour palette, unique fonts, and logos into your films with the Essentials plan.
The Essentials plan’s cloud storage backup may be its greatest strength. In this way, your material and work projects are safely stored in the cloud, where you may access them from any computer.
Starting a Clipchamp project
Clipchamp’s landing page, accessible from the main menu, is where you can initiate a new production. Even if you already have a Microsoft account connected to Windows 11, creating a Clipchamp account is a necessary step. Assuming you’ve already registered, the homepage will look like this:
Right here are several options for kickstarting your next video project. You can start a brand new video from scratch by clicking the Start a new video button at the top of the page. This could be the best choice if you desire to use only your own resources.
Starting with a template
Underneath it, you’ll see the option to create a new project from a preexisting template. You can also find templates with the correct aspect ratio in certain categories, such as those made for YouTube or Instagram. The most popular ratio for Instagram photos is 1:1, thus that’s the ratio used in most Instagram themes.
You can use the numerous video, audio, and text templates to make a layout or just add an introduction or conclusion to your film. You can use multiple templates on a project, as they can be added at any time.
Starting with a recording
If you like, you can even begin a video production with an entirely fresh recording. When creating a presentation or a tutorial, you have the option of recording either just your screen or just your webcam. A recording can be added at any time during the editing process.
After pressing the record button, you’ll be asked to select a recording device, such as a computer’s webcam and microphone. Once you’re ready to begin recording, simply press the button.
- If you’re recording your screen at the same time, you’ll be given the option to record the full screen, a single app window, or a region of the screen. System audio can be recorded also, albeit it is muted by default.
- After selecting the area of the screen you wish to record, the recording process will begin automatically and can last up to 30 minutes. After you have finished recording, you can review it to decide whether to redo it or incorporate it into your final product, which will look something like this:
- You may edit the webcam and screen recordings separately to get them just how you want them after they’ve been captured. Now we can move on to the next section, which is the editing process itself.

How to use the Clipchamp video editor in Windows 11
After starting a new project, the bulk of your time will be spent on the video editing interface. We won’t be covering video editing in great depth, but here’s a quick overview of the software and some of the things you can do with it.
You can see from the image above how the video editing interface is broken down into its several parts. Your video preview is front and centre so you can visualise the end outcome, and you can easily reposition and resize video elements, as well as adjust the aspect ratio if you’re aiming for a certain format. A video timeline containing all the currently uploaded music will appear below that. There is a lot of empty space on this screenshot because no media has been added yet, but you can actually add as many tracks as you like.
Tools for working with content, such as media previously imported into the project, stock assets, templates, and so on, are located on the left side of the interface. You may find filters and effects to use in the final video on the right.
The timeline
You can edit numerous video and audio files simultaneously in Clipchamp because it is a multi-track video editor. As an example, you can record your voice and then add music to it, or you may record your screen and then superimpose a video of yourself recording the screen. Having started with a template that included these elements, we were able to quickly generate a large number of tracks, as demonstrated in the following screenshot.
- In order to create distinct segments of a video, for instance, you can cut, delete, and reorder objects on the timeline.
- Additional material can be added to the final video by dragging files from the media pane to the timeline. A new track can be made by dragging content into the borders of an existing track on the timeline, or content can be dragged into an existing track directly.
- Keep in mind that many videos also have audio tracks, which Clipchamp may automatically combine unless you specify otherwise. It is possible to make changes to the audio in the video itself, or to separate the two tracks so that each can be edited independently.
- Then, you can easily transfer the sound to another application. The timeline interface should feel quite familiar to anyone who has ever edited a video.
Media and content tools
When you launch a project for the first time, the default view displays the media files you’ve already imported into the project on the left side of the interface. The media files you see in the preview below were used as part of a project based on a template.
When you get to this point, you can take a few different routes to expand the video’s content. You may see the menu’s full range of choices below:
- Your media – Using your mobile device and a QR code scanner, you may manage the media files already included in your project and upload new media files from your local storage, the cloud, or even from elsewhere. When you add your own media to a project, it won’t immediately appear on the timeline, giving you complete creative freedom over the final cut. When you’ve accumulated a large number of assets, the ability to sort your existing media by kind can be very helpful.
- Record & create – As we’ve already established, this tab in Clipchamp is where you may initiate a screencast, webcam recording, or both. You can also use a text-to-speech generator to have your written words spoken by a computer and added to the video. A variety of language and voice options are available for the narration.
- Templates – Insert text, images, and other media into premade layouts for things like outros, intros, and splash screens. Audio, video, and visual media are just some of the file types that can be used in conjunction with a template. A new template will be added to the timeline after the current one is selected.
- Music & SFX –You can enhance your video with pre-existing music and sound effects from the Clipchamp library. Many different types of music are available, allowing you to dial in your mood precisely. Only the Essentials plan costs money and grants access to all of the assets.
- Stock video –Put in some video overlays and stock material from the Clipchamp library. The Essentials plan, which costs money, grants access to additional resources.
- Stock images – Create a video using Clipchamp’s stock footage and photos. To spice up your movie, you can use still frames and overlays. Although some features are unlocked at no cost, the most majority will demand at least the Essentials package.
- Text – Title screens, subtitles, and lower thirds all add text to a video. If you subscribe to the Essentials tier, you’ll also have the option of uploading your own custom fonts in addition to selecting from a number of pre-existing options.
- Graphics –Video effects like as overlays, backgrounds, GIFs, and stickers can be added.
- Transitions – When navigating the timeline and swiping between video clips, transition effects can help viewers understand the change.
- Brand kit – Consult the materials in your brand manual, such as your logo and colour scheme. The Essentials plan is required for this function.
Filters and effects
Finally, you’ll find a selection of filters and effects that may be applied to the timeline’s material in the right-hand pane. Some options are only accessible while working with video files, while others are accessible only when working with audio files.
Here’s a quick rundown of all the options available here:
- Adjust colors (available for video, image, and text assets) – Modify the asset’s attributes like exposure, saturation, and contrast.
- Audio (available for audio assets or videos with an audio track) – A finished video’s audio level can be adjusted in this way. The music in the background can be turned down while your voice is amplified.
- Colors (available for text assets) –Modify the font and background colours.
- Fade (available for all asset types except transitions) – Create transitions that fade in and out for the specified object.
- Filters (available for video, image, and text assets) – Make aesthetic adjustments by applying filters to the media file. Certain filters are Essentials-only accessories.
- Speed (available for video assets and motion graphics) – Modify the file’s playback speed to your liking.
- Text (available for text assets) –Modify a textual asset’s copy, typeface, and positioning..
- Transform (available for text assets) – Modify a text asset’s font, size, and placement. Keep in mind that the text on the video preview can be repositioned by dragging it.
- Transition (available for transition assets) –Modify both the timing and animation of the transition.
Exporting your project
The final step, exporting the movie after you’ve made any necessary changes, is painless. If you want to export your work from Clipchamp, just hit the Export button at the top of the window. Export your videos in 480p, 720p, or 1080p, or as GIFs if they’re under 15 seconds long.
- Clipchamp can also detect when there are blank spots in your video and provide you a warning before you export the movie, preventing you from having to re-edit the video afterwards. Once you decide on a target resolution, the export will begin and the file will be downloaded to your computer immediately. You can also upload it directly to sites like YouTube, TikTok, or Pinterest, or store it to a cloud storage account.
- To sum up, those are the fundamentals of Clipchamp that any new user should know. In comparison to programmes like Adobe Premiere or DaVinci Resolve, this video editor is obviously more simplistic. Nonetheless, it’s not too difficult to learn the ropes, and the end result can be entertaining. It’s a fantastic resource for those just starting out with video editing, but it might not be up to par for professionals.
- Check out our other guide for more information on Windows 11’s newest features if you’re not interested in the File Explorer updates introduced in the Windows 11 2022 Update. Another new safety feature, Smart App Control, prevents malicious programmes from starting.

Also Read:
4 Ways to take a screenshot on windows 11
How to Pair Bluetooth with Laptop With Windows 11, 10, 8
Windows 11 and windows 10 comparison: Is the Upgrade Worth It
Should I Upgrade to Windows 11 for Gaming
FAQs:
Q1: Is video editor available in Windows 11?
OpenShot is a free and reliable video editing programme that works well under Windows 11. You can add titles and transitions to your videos, as well as use the watermarking and text overlay tools. The user interface of this video maker is clean and flexible.
Q2: Is win11 better than 10?
In a nutshell, upgrading to Windows 11 will make your computer feel more responsive, with programmes opening and shutting down swiftly. Windows 11 is even faster than Windows 10, which is already very quick.
Q3: How do I make a video on Windows 11?
That Can Be Edited From Start to Finish: If you want to launch Video Editor, just type “video editor” into the Search box or choose “Video Editor” in the Start menu. Choose to create a new video. Give your clip a title, and then click OK.
Q4: Is Clipchamp a good video editor?
Microsoft’s new free video editor, Clipchamp, is fantastic. It’s easy to use but powerful enough to make a professional-quality holiday video, funny joke, or even an advertisement. You’ve probably never used it, but Microsoft’s Paint 3D is one of the best creative tools out there.
Q5: How do I combine videos in Windows 11?
It’s simple to attach two clips together. You may add media from your computer by clicking the large plus sign (+) in the top left corner and dragging the files into the timeline on the right.
Comments are closed.