

In the digital world, we live in now, keeping our gadgets and private information safe is more important than ever. Secure Boot is an important feature that keeps illegal software and malware from harming your Dell laptop. Secure Boot is a way that computers, like Dell laptops, keep you safe.
During the process of starting up, it checks to see if the program and operating system are real. By turning on Secure Boot, you can make your system much safer from risks and changes that were made without your permission.
In this step-by-step guide, we’ll show you how to set up Secure Boot on Dell computers. This will make you feel better and make your computer safer.
Table of Contents
What is Secure Boot?
Modern computers, like Dell laptops, have a safety feature called “Secure Boot.” It makes sure that when the computer wakes up, it can only run digitally signed software, like the operating system and kernel. This way stops code from running that is bad or against the law. This keeps the process of starting up your laptop safe and sound.
Why should we Enable Secure Boot on Dell Laptops?
You can get a number of important benefits from turning on Secure Boot on your Dell computer. First, it keeps malware-like boot kits from taking over the boot process. Secure Boot makes sure that only known and accepted software can run by checking the digital signatures of the software before it starts.
Secure Boot can also keep operating systems from starting up on your Dell laptop that you didn’t install. In a business or company setting where data security is important, this is very important. You can make sure that only the operating system you want and know will work will start up by turning on Secure Boot. This makes it less likely that someone will break into your system or steal your information.
Checking if Secure Boot is compatible With Your Laptop
Make sure your Dell laptop can handle Secure Boot before you turn it on. Here’s how you can tell if they go well together:
- Turn on your Dell laptop and wait until the Dell logo appears on the screen.
- Press the right key, which is usually F2 or F12, to get to the BIOS or UEFI settings. The key may be different depending on the machine you have.
- Find the “Security” or “Boot” area in the BIOS or UEFI settings.
- Make sure “Secure Boot” is there and turned on by looking for it.
If you look in your laptop’s BIOS or UEFI settings and can’t find Secure Boot, it might not support this feature. You might want to update your device or do something else to protect yourself in these scenarios.
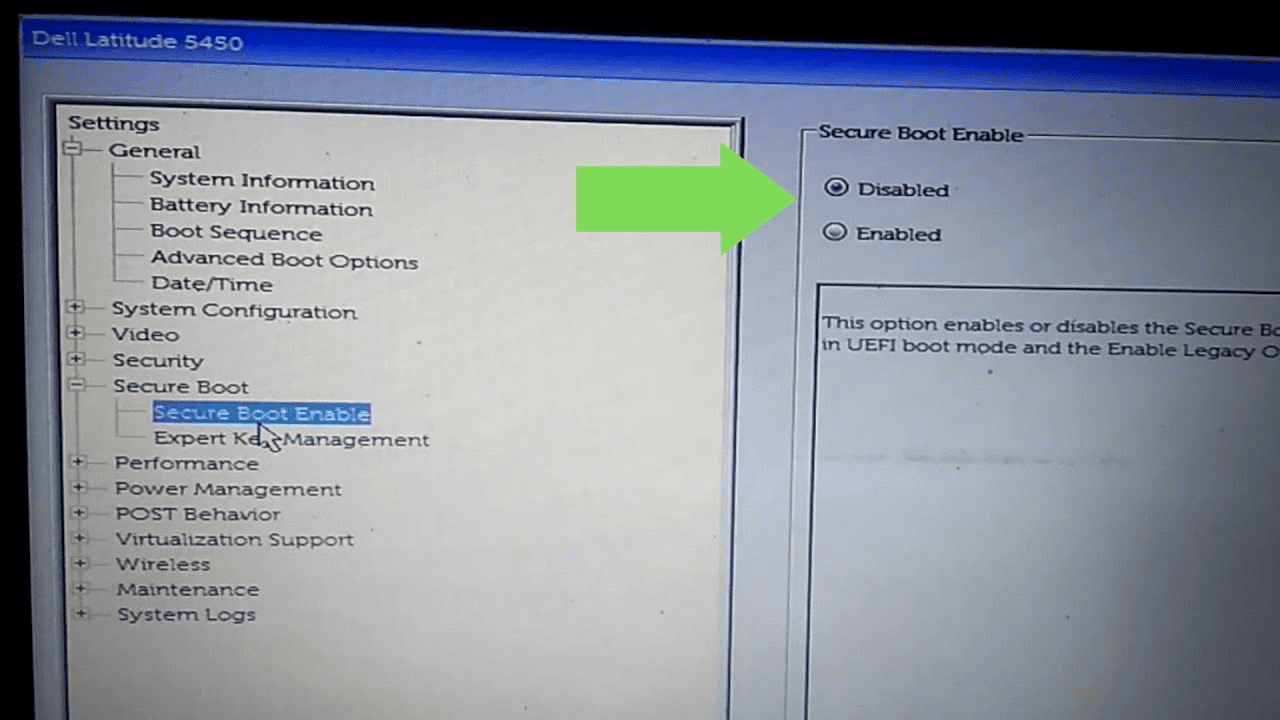
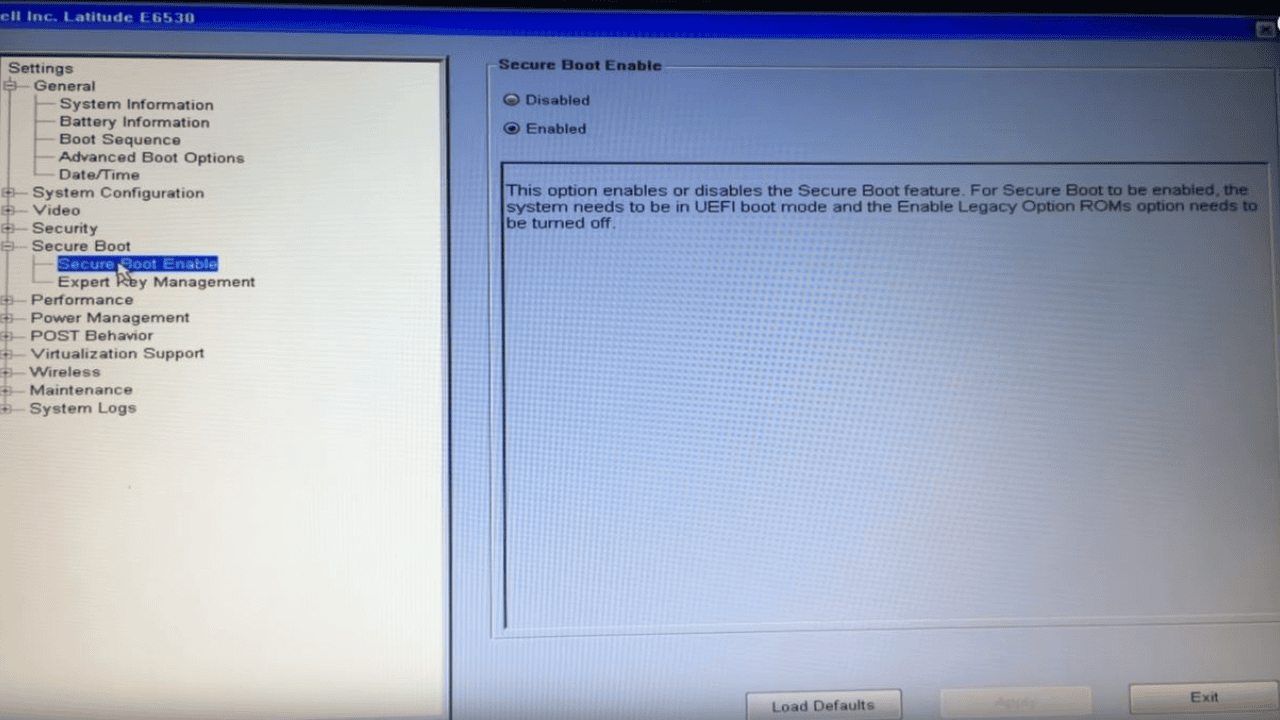
Enabling Secure Boot on Dell Laptops
Once you know for sure that your Dell laptop can use Secure Boot, you can turn it on. This is what you should do:

- Turn on your Dell laptop and press the right key (usually F2 or F12) during startup to get to the BIOS/UEFI options.
- Find the “Security” or “Boot” area in the BIOS or UEFI settings.
- Find “Secure Boot” and turn it on by clicking “Enabled.”
- Don’t change the BIOS/UEFI settings, but save the changes you’ve made.
Only apps and operating systems that have been safely signed will be able to run during the start process when you turn on Secure Boot. So, you should make sure that any operating system or software you want to put on your Dell laptop has been digitally signed by a trusted source.
Troubleshooting if Secure Boot is Facing any Issues
If you turn on Secure Boot on your Dell laptop, you can do a few things to fix problems:
1. Make sure operating systems and drivers are compatible with Secure Boot.
Both the operating system and the drivers must be signed for Secure Boot to work. Make sure that your operating system and device drivers work with Secure Boot. Find out if your computer can use Secure Boot by looking at the manufacturer’s website or directions.
2. Verify that the operating system’s digital signature is correct
Make sure that the operating system you install or update comes from a trusted source and is digitally signed. This makes sure that the software can be checked when the machine wakes up.

3. Update the software for BIOS/UEFI
When the software is out of date, Secure Boot doesn’t always work right. Check the Dell help page to see if the BIOS or UEFI software on your type of laptop needs to be updated. Do what Dell tells you to do to change the program.
4. Disable or remove incompatible hardware
Secure Boot can sometimes go wrong when the parts don’t work well together. If you just put in new hardware, try turning it off or taking it out for a short time to see if that fixes the problem. If the problem is no longer happening, call the gear maker to change the software or get more help.
5. Reset Secure Boot settings
If Secure Boot is giving you problems that won’t go away, you can try putting it back to how it was before. Go to the BIOS or UEFI settings, find the “Secure Boot” part, and in the “Restore defaults” drop-down menu, choose “Restore defaults.” Save the changes you made, and then turn on your computer again.
6. Contact Dell support
If you’ve tried everything to fix the problem and Secure Boot is still giving you trouble, call Dell support for more help. Their expert support team can help you with any problems you are having with your Dell laptop and give you specific advice.
Conclusion
If you want to make sure your Dell laptop is safe when it wakes up, you must turn on Secure Boot. Secure Boot adds another layer of protection against malware and illegal operating systems by making sure that only known software that has been digitally signed is run.
This guide tells you everything you need to know about Secure Boot on Dell computers and how to turn it on. We’ve also talked about Secure Boot, why it’s important, and how it can help protect a machine better. However not only for Dell laptops, but enabling Secure Boot is helpful in other motherboards also like MSI, Lenovo, or Asus Motherboards.
Before you turn on your Dell laptop, make sure that Secure Boot works. Use operating systems and tools that have been digitally signed as well. If you have any problems, follow the steps or call Dell support for more help.
Also Read: Methods to Fix Pxhlpa64.sys Memory Integrity Error in Windows!
Follow these steps to make your Dell laptop easier to use by turning on Secure Boot. In today’s digital world, it’s important to keep your boot process safe, and Secure Boot is a big part of that.