


What does it imply when a phone requires flashing?
In different circumstances, mobile phone users flash their phones for various reasons. When a phone becomes stuck, bricked, dead, or has locking problems, it may often need flashing. For these reasons, you are not able to use your phone correctly or it is completely inaccessible, so it is very important to first find out if your phone is damaged? When you do a flashing procedure, a new ROM is installed on top of the one that was already on the phone.

A closer look at the process described above provides a tremendous amount of knowledge on how to re-flash a phone. Because of this, don’t spend your money by buying a new phone if your device is having software issues that can be fixed with a simple software update.
Do you have to flash custom ROMs on your Android phone? You may use several different approaches to restore a smartphone to its original settings.
Despite this, it is possible to safely state that it is a challenging and risky task for you to attempt on your own since if anything goes wrong, you might end up ruining your valued phone.
So, are there any methods you can do without putting yourself in danger? It’s a comfort to know that we have your back. Today, in this article, we will show you some of the finest and most efficient ways for installing a new operating system on your Android phone. Proper attention will let you successfully flash your Android smartphone.
If you are planning on flashing your phone, then you should understand the reason(s) for doing so. There are several situations where you must flash your Android phone. However, just a few of these will be shared with you. If you find yourself in this position, then follow our step-by-step instructions outlined in this article to use your phone’s camera flash. Let’s examine those points further.
Table of Contents
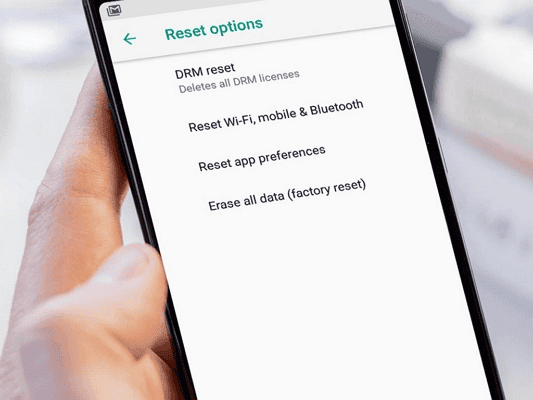
To repair a phone that is either frozen, bricked, dead, or locked:
If your phone locks itself, you may encounter this kind of scenario. You cannot access the device when there is no factory reset.
When you forget the password or for any other reason, this may happen. Also, how are you supposed to do this while your phone is locked?
This is annoying for users since they have no idea what to do?
If you are locked out of your Android phone and need to erase it when you have forgotten your password, this article will assist you.
Our passion for Android devices is rooted in their versatility and customizability. Android, however, is open-source, which means it is particularly susceptible to problems resulting from operating system updates.
Your phone may become jammed or bricked for no apparent reason. These problems have many possible solutions. The overall answer, though, is to just “flash” your phone.
To do a fresh custom ROM installation
The software preinstalled on your Android phone is often known as the OS (Operating System)/ROM. Stock Android ROMs aren’t the greatest options out there for various reasons. Custom ROMs are created as a consequence, many individuals building their own ROMs that replace the standard ROMs.
Custom ROMs provide extra functionality that are not provided by the stock OS. With a custom ROM, your phone could be quicker, have greater battery life, and give you a fresh appearance. In order to install a custom ROM, you need to flash your phone.
It is better to attempt a hard reset before flashing your phone.
You should be aware that there are repercussions to flashing a phone. You will lose all of your phone’s files and data. In addition, you may not like the new custom ROM after you’ve installed it.
To put it another way, it implies you will have to repeat the procedure. Additionally, a hard reset can solve a lot of problems without human intervention. If you flash your phone incorrectly, you may permanently harm it. So, try to hard reset the phone before you attempt to flash it.
There are several Android phone models to choose from. It’s important to note that this isn’t true of all smartphones. There are a variety of methods, some of which are more effective. We were not able to reveal all of the methods we have at our disposal.
Instead, we’ll provide a single approach that’s functionally equivalent to almost all of the existing techniques. Hence, read our post to discover all of the methods in “All best ways to hard reset a phone – Samsung, Sony, LG, HTC, etc in 2021”
The second part is: Learn how to flash your Android phone.
No matter how many times you reset your phone to its factory settings, if the problems continue, you have no other choice than to do a factory reset. Now, you have many options when it comes to unlocking an Android phone. However, all of the techniques require considerable amounts of physical labour and technique. Consequently, it comes with the danger of irreversibly destroying your phone. As a result, what is possible in this situation?
This is good news, since certain smartphone applications can automatically update your firmware. While it is simplified, there is no danger in testing the programme out because the process is likewise risk-free. Let’s show you many ways for unlocking your phone in this part. Before beginning the process of flashing a phone, you must take a backup of all of the phone’s data. If you are backing up your Android phone, you may use this technique. In addition, we will discuss how to safely back up your data below.

Backing up your data is critical on an Android phone.
- Navigate to the Settings app on your phone in order to make changes or preferences.
- Finally, go over to the System > Advanced > Backup option.
- To proceed, simply search for “Backup” in the Settings menu using the search bar at the top and touch on the “Backup” option.
- In the next step, tap on the ‘Back up now’ option
- Finish the process by tapping on ‘Continue’ to begin backing up
In the process, keep in mind that every Android phone is different. The aforementioned technique allows you to back up all of your phone’s settings and data to your Google Account. Take a look at some more suggestions on this subject.
Some important things to know before you go!
- If you would want to take a more manual backup, transfer all the movies, music, photos, and so on to your PC to do so.
- You may also transfer all the data to your own Google Drive account, which also allows you to sync your other personal Google products such as Gmail and Calendar.
- Save pictures using Google Photos to make them easily accessible in the future.
- Back up documents with a Google Drive account
- Using Text Message & Call Log backup applications can help you keep track of your texts and phone calls. These kinds of applications may be found on the Play Store.
It is always recommended to back up all your data before doing a flashing operation since this procedure will destroy all of your phone’s data. On a PC, cloud, or SD card, you may accomplish this. To access the backup procedure, you must be able to flash the phone using a computer.

Your phone model is taken into consideration while backing up your contacts, therefore your individual situation should also be considered. To do a cloud backup with your Google Account, you must make sure your phone settings are correctly configured and then use your phone to perform the backup. You can preserve all your text messages and call records using cloud backup.
You can either save your videos, music, photos, app data, and anything else on your computer, or you can send your videos, music, pictures, app data, and anything else to the cloud. You may also use the Google Play Store to discover backup apps that can assist with the process of storing.
If your phone is either broken or frozen, you cannot use this method. Rather, you may use any recovery tools to attempt to retrieve your data. Of course, there is the possibility that it will not be feasible. Once you have online backup, it’s always best to have it on. To avoid you having to attempt any of the other potentially dangerous ways, we will now speak about the simplest and safest way to phone-flash your phone. And so, let’s begin.
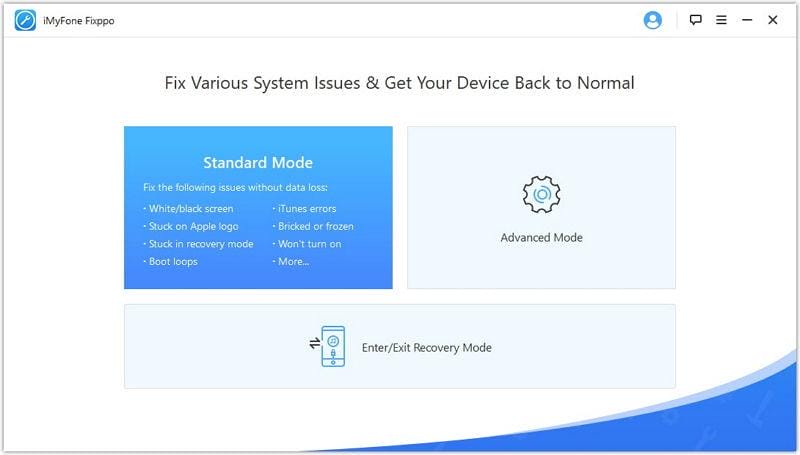
Method 1: Use an easy-to-use programme to install a new operating system on your phone.
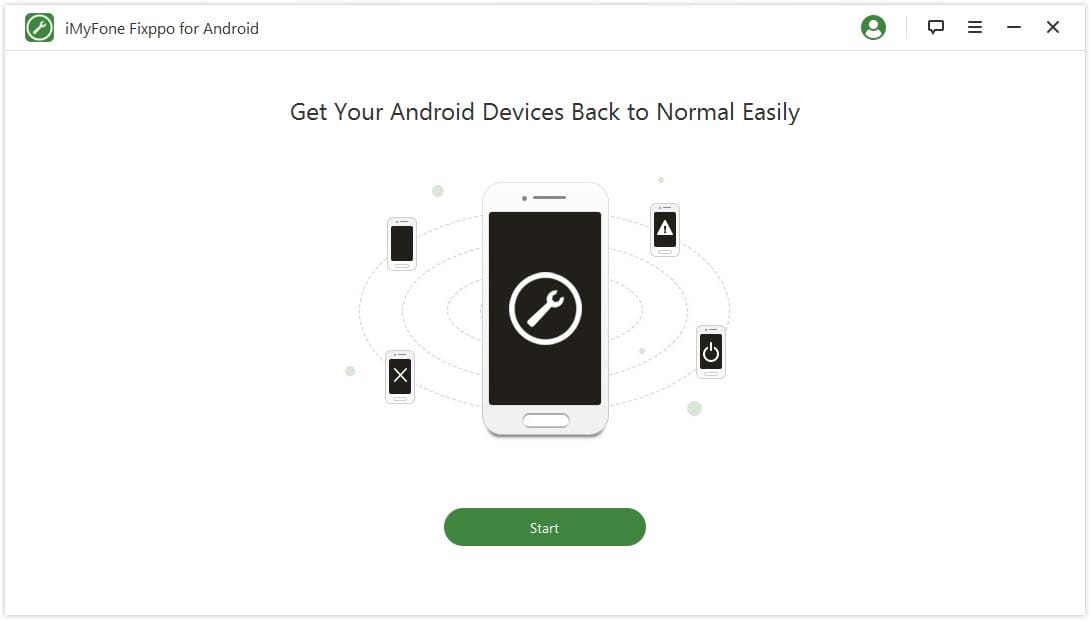
In this section, we’ll demonstrate how to automatically flash your Android device using a third-party programme. iMyFone Fixppo for Android is the name of the programme. It is very simple to utilise this programme. Additionally, you may use this one without any danger involved. Okay so now, let’s learn how to use iMyFone Fixppo to restore the Android phone OS. To flash your phone using this programme, there are just three simple steps.
So, let’s get going…
If you have not yet installed iMyFone Fixppo on your PC, then download and install it first. Lastly, start the application on your computer, click on the ‘Start’ button, and wait for the programme to begin.
Step 1: Next, describe your Android phone on the following page. When you’ve correctly entered all the necessary information, just click on the ‘Download Firmware’ button. by doing that action, the firmware for your phone will begin to download.”
Step 2: To complete the next step, plug your phone into your PC using a USB connection and turn on the download mode on your phone. Lack knowledge on how to access the download mode? if you have the ability to use iOS, then use iMyFone Fixppo for Android. It has step-by-step instructions available.
Step 3: Finally, your phone will be recognised by iMyFone Fixppo for Android, and it will immediately begin to flash your phone. Don’t worry. The procedure will take care of itself after it finishes. It will restart on its own after your phone has been successfully flashed. Finally, click on the ‘Done’ button to complete the process.
See? That was such an easy solution. However, we will also offer another technique that is helpful to those who want to flash their Android phone down below. Alright, let’s do it.
QFIL Flash Tool
With the Qfil flash tool, you can quickly flash your Android phone. The free flashing programme enables you to flash stock ROMs, as well as any other kind of firmware that is offered, from stock.
Use the QFIL flash tool to write files to your microSD card.
- The first step is to download the flash file, flash tool, and USB drivers from your own computer.
- Then, use the included USB drivers to install the drivers for your Android phone.
- The next step is to open the Flash tool on your PC.
- Switch off your Android mobile phone after you’ve done everything else.
- Next, hold down the volume-up button together with the power button.
- Connect your phone to the PC using a USB connection after that.
- To download the Flash file, point your browser to the flash-tool webpage and click the “download” button.

- Tap on “Now Flashing” on your phone now.
- Flashing may take anywhere from 10 to 15 minutes. Please wait while the system has finished flashing.
- When the upgrade is complete, your device reboots.
- While your cell phone is still flashing.
- Remove the phone from the PC, and you’re done.
Download QFIL Flash Tool:

SP Flash application
MediaTek Android device flash is best handled using the SP Flash utility (Smartphone Flash Tool). Firmware, stock ROMs, recovery files, and kernels are all freely available to download and flash.
With all MediaTek Android devices, Smartphone Flash Tool is functioning (MTK based).
There are many functions that may be performed with the SP Flash Tool.
- If your device has been bricked, you need download and install the flash-tool to fix it.
- Assured Android device memory checking.
- Change settings and see the results.
- Formatting / Wiping / Resetting your Android phone based on the MTK chip.
In order to flash using the SP Flash Tool, do the following steps:
- Next, to install the SP flash tool, you must first download and unzip the SP flash tool package.
- Once that’s done, open the SPFlashtool.EXE and choose the Scatter Loading option.
- Finally, make sure that you unchecked every single box.
- Now, choose the “Recovery Image” option on the left, and then click on the box to load the appropriate recovery image for your Android smartphone (load image from the separate window then click on open).
- The screenshot now shows you where to get the recovery image and the RECOVERY box is ticked.
- Then, uncheck any item you don’t want checked.
- Do you want to turn off your Android phone now?
- Once connected, plug the phone into a USB port on the PC.
- This is when you should click the “DOWNLOAD” button that appears at the top (not the tab).
- Click on the Yes button after that.
- Finally, wait for a little while, and your cell phone is fully charged.
You will be presented with a green circle on your computer screen when you successfully complete a run. Congratulations on installing SP Flash Tool on your MediaTek Android devices.
The second method is to manually flash a custom ROM onto the Android device.
Please bear in mind that this is a hands-on process. As such, if you make a mistake, you can’t undo it. If you are acquainted with the intricacies, we would recommend this approach. Additionally, if this technique does not work or damages your phone, we are not liable. Take personal responsibility for this project. Despite this, it may sometimes be a little difficult to use this technique.
You’ll need these things:
- Your Android smartphone is completely fine.
- Always back up your gadget, even if you’ve previously backed it up.
- A customised ROM
- Custom recovery
- The boot-loader is unlocked
- You should be charged at least 50% on your smartphone.
Here are the steps to follow:
First and foremost, download a custom ROM.
Custom ROMs are easily found on the web for almost any Android phone. Choose the one you like most. The important thing to remember is that you need to locate the right ROM for your phone. In other words, check to see whether it will work with your carrier and phone type and so on. On sum up, open the .zip file, save it to your phone, and then enjoy it.

If you don’t have a computer, using the custom ROM download method is the easiest way to flash a phone. The major advantage of utilising an Android device is custom ROMs.
A modified ROM may provide your phone a better experience if you are tired with the standard user interface. If you decide you’re bored, or anything goes wrong, you can simply go back to the original firmware. To upgrade the firmware on your phone, how would you do it?
You are ignorant of the trusted ROM and firmware sources if you are unsure how to flash an Android phone yourself. Many companies provide an online database of their phone’s firmware, which may be accessed with the proper software. However, several other models provide the same platforms and provide downloadable software applications.
To get a custom ROM, however, you must go to the XDA Developer’s forum, and you may download the appropriate ROM for your device there. To ensure the app will work with your phone, locate the model number on the back of your phone. Once you’ve downloaded it, store it on your SD card.
Unlocking the Boot Loader, which is an optional step and is not necessary always.
Only after unlocking the bootloader, you will be able to flash your phone. Your computer’s BIOS functions similarly to a bootloader. By default, all Android devices come pre-installed with locked bootloaders that prohibit users from downgrading or upgrading the operating system. Unlocking the bootloader is achieved by using the “fastboot oem unlock” command.

Of course, the command will vary according on the phone type; nevertheless, most phones are supported. You may generally use the fastboot flashing unlocks command to unlock your phone if you have placed it in flash mode. To use this programme, you must first connect your phone to a computer via a USB cable and use the Command Prompt (command.com) interface. You may need to input a bootloader unlock code on certain handsets.
Since you should obtain the code from the manufacturer’s website, do it now. Some phones need more advanced methods to remove the lock, and bootloader unlockable phones exist.
Almost all Android phone owners can modify the system by unlocking the bootloader. A few of manufacturers, however, lock the bootloader as well. If that’s your situation, then you need to speak with your phone maker to get the bootloader unlocked on your phone.
Boot in Recovery Mode
You’ll now need to enter the recovery mode using the recovery combo buttons. Device to device, the recovery combo button varies. To search the web for specific information on entering recovery mode on your particular device, do a web search for “How to enter recovery mode on a device.”
That is, except in the majority of situations, the Volume Down + Power button should be used. As you press these two buttons at the same time, hold down the buttons for at least 5 seconds. If you choose the aforementioned option, your phone will boot into recovery mode.

While technique differs with various phone models, holding down the volume-down and power buttons while turning the phone on will take you into recovery mode. You must enter recovery mode to do so. You may find the proper combination on the manufacturer’s website.
When you press the button, you will boot into the boot loader screen that offers a variety of choices. Select recovery with the power button. This is one of the most difficult aspects for those interested in the topic of how to ‘flash’ a smartphone. There are no more choices to choose from, just recovery mode alone.
Flash finally:
Depending on whatever recovery mode you are using, you will see a particular screen while you are in recovery mode. ClockworkMod, TWRP, Cyanogenmod, and Red Wolf recovery modes are all accessible as recovery options. Though popular recovery modes like as ClockworkMod and TWRP are shared, this article will focus on utilising ClockworkMod and TWRP.
Once you’ve selected the ‘Install’ (on TWRP) or ‘Install zip from ‘sdcard’ (on ClockworkMod) option from the recovery mode screen, press the “Install” (on TWRP) or “Install zip from sdcard (on ClockworkMod)” (on ClockworkMod) to begin the installation. Finally, locate the custom ROM you have just downloaded and begin installing it.

You will need to find and choose the custom ROM (.zip) file. From there, you may proceed with the installation of the chosen ROM. Make your choice between ‘Swipe to Confirm Flash’ (on TWRP) or ‘Apply update.zip’ (on ClockworkMod). Additionally, your phone will have this new custom ROM installed, and then your phone will be flashed.
You may configure the recovery mode to include a number of different choices. The install button is the only thing you need to focus on. Here, you will notice the wipe, the installation, the settings, the backup, and many other steps. Keep in mind that any incorrect action on your part may ruin your phone.
Caution is, however, advised while returning to the recovery page. Use the “volume up” and “volume down” buttons to go to the “install” button, and then use the “power” button to choose it once you are ready.
When you next come to this page, you will be asked to choose the firmware you wish to use on your phone. Once you stored the firmware on your SD card, choose the option “Install from SD card” and proceed with the firmware flashing. If everything works as planned, your phone will reinstall the updated software.
And that is how you reboot a phone, or update the device with a custom firmware that has an issue that cannot be resolved with a standard reset.
Wipe the Cache:
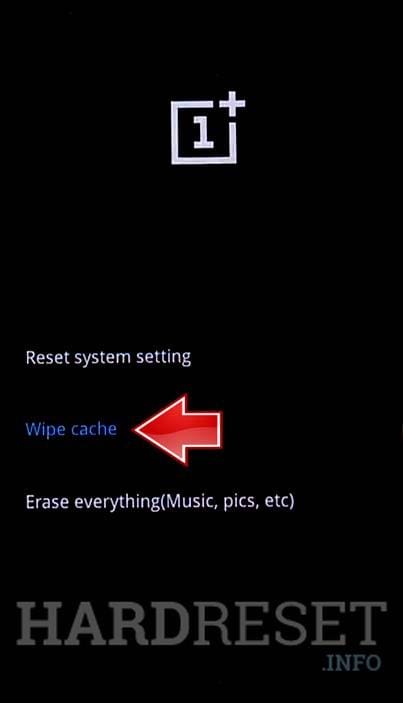 Flash your phone, then use this feature to wipe the cache data. Just boot the recovery mode, choose the “Wipe cache partition” option, and your Android phone will have its cache wiped clean.
Congratulations! Since you flashed your Android smartphone, give yourself a pat on the back. However, you may also utilise one or more of the following ways to do an OTA flash of Android.
If you’re planning on using one of those ways, you will need a PC and specialised software (such as the Flash Tool) that corresponds to your phone brand. While we won’t disclose all these techniques, you may find some useful. We won’t include all of the popular flash tools, but here are a handful of the more popular ones. In such case, you’ll be able to locate them on the internet.
- For Samsung devices – Odin
- For Nexus devices – Nexus Root Toolkit
- For MediaTek Chipset – SP Flash Tool
- For Sony Xperia devices and so on – FlashTool
- For Chinese brands – Miracle Box
Ending on a high note:
We have shown many ways of flashing an Android phone in this article. All of these approaches are effective. It is possible to make comparisons, however, some are better than others. Thus, if circumstances require, certain options may be riskier than others. We endeavour to provide the best answer to our readers, but it does not always mean we agree with them.
Since you will not need any technical skills to utilise this app, we strongly recommend that you use the iMyFone Fixppo Android app instead. In addition, it is the safest and least risky of all the methods. It may be utilised with any Android phone brand, and furthermore, it works with any one of them.
Feel free to share any questions or inquiries regarding updating your Android device below!
Is it possible to unlock an Android phone that has been “locked” using another Android phone, correct? In that case, how?
No, this is physically impossible. If you want to flash a new ROM, you will need a computer. In Android devices, the ROM cannot be flashed using the command prompt (or any other devices). If you unlock the locked android using another Android phone, you won’t be able to make any modifications to it. Here’s hoping this helps!
Comments are closed.