

How to install ADB on Windows, macOS, and Linux. Many Android platform functionalities are inaccessible to the general user and instead require specialised routes and procedures. The Android Debug Bridge (ADB) is a tool that Google provides for developers to debug various sections of their applications or the system, but which we can utilise for all kinds of neat and hidden tricks, and is typically how they have been accomplished. Installing ADB is a prereq for using these tips and tricks. This tutorial will show you how to set up ADB on Windows, macOS, and Linux in a matter of minutes.

Table of Contents
How to install ADB on Windows, macOS, and Linux
Note that installing ADB on the computer is only half the battle; your mobile device must also be prepared to receive ADB commands.
Phone setup
- Swipe up from the bottom of the screen to access the Settings menu.
- If you go down far enough, you should find the About phone option.
- The “About phone” page on your device may be renamed or located in a different section of Settings, depending on the OEM skin you’re using.
- After that, enable Developer Mode by tapping the Build number option seven times. There will be a notification toast when it is complete.
- You should now be able to enter the Developer settings menu from the main Settings screen. The Developer options menu may be hidden under Settings > System on Google Pixel phones and other devices.
- To begin, open the settings and activate the USB debugging option.
- You have completed a significant portion of the phone setup process. The next step is to look down at the specific instructions for your operating system and implement them.
How to set up ADB on Microsoft Windows
- Get the Windows ZIP file containing the Android SDK Platform Tools.
- Please unzip the contents of this archive to a location where you’ll find it quickly (such as C:platform-tools).
- Launch Windows Explorer and navigate to the folder containing the ZIP file’s contents.
- Now, launch a Command Prompt session from the same folder where this ADB programme is located. To open a command window in a certain folder, you can right-click anywhere inside the folder while holding Shift, and then select the corresponding menu item. Users of Windows 11 should be able to right-click and immediately see “Open in Terminal” without needing to hit the Shift key.
- Use a USB cord to link your mobile device to your personal computer. Select “file transfer (MTP) mode” from the USB menu. Keep it in this mode for maximum interoperability across manufacturers. Some OEMs may insist on it.
- To activate the ADB daemon, type the following into the Command Prompt: adb gadgets
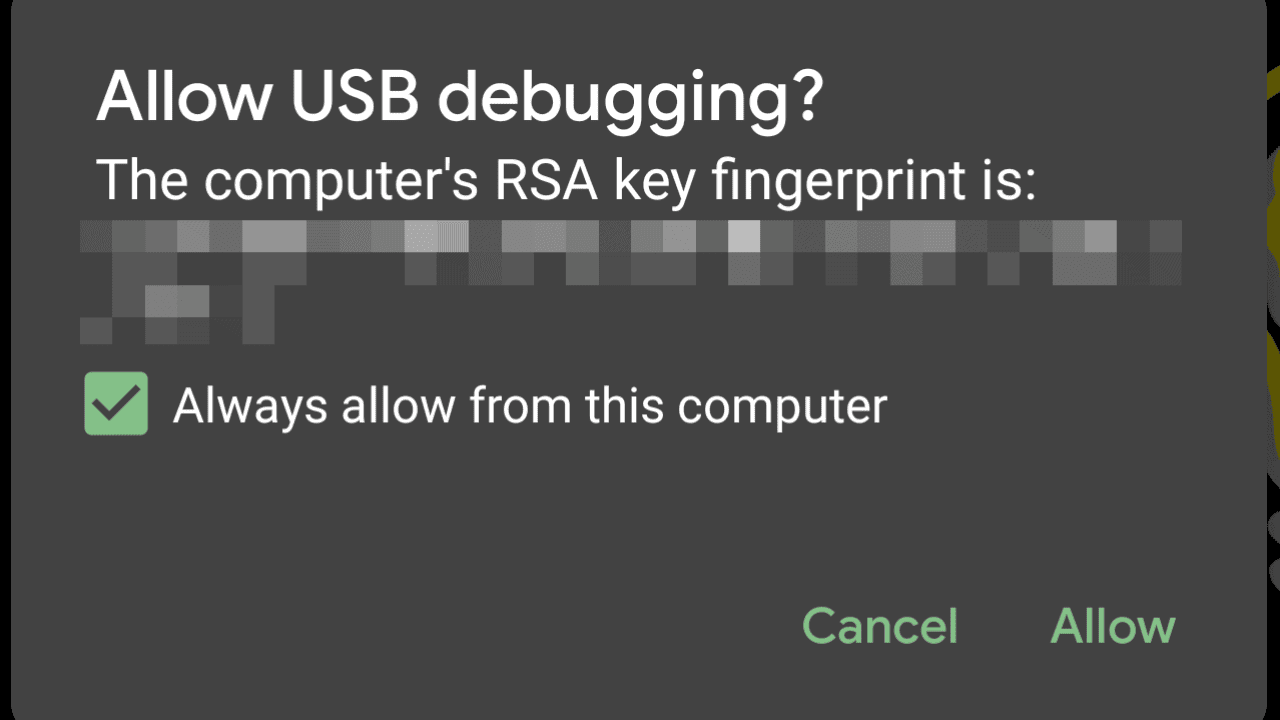
- There will be a prompt on your phone’s screen asking whether you want to enable USB Debugging. When requested, it is only natural to accept USB Debugging (and tap the always allow check box if you never want to see that prompt again)
- Repeat the step 6 command and you’re done. If everything went as planned, the command prompt will display the serial number of your device (or the PowerShell window). Yay! Your device is now ready to receive any ADB command. Use our comprehensive list of guides to begin modifying your phone immediately.

How to set up ADB on macOS
- This ZIP file contains the Android SDK Platform Tools and is intended to be used with macOS.
- Unpack the.zip file somewhere convenient (like the Desktop for example).
- Invoke the computer’s terminal.
- Here’s the command to use if you want to go looking for the folder you extracted ADB to: On my Mac, the command was cd /path/to/extracted/folder/ cd /Users/Doug/Desktop/platform-tools
- Use a USB cable designed for use with a Mac to link your device to the computer. Switch to “file transfer (MTP) mode” on the USB connection. While this isn’t always necessary, it’s preferable to leave the device in this mode just in case.
- The ADB daemon can be started by typing./adb devices in the Terminal once you have navigated to the same folder as your ADB tools.
- A “Allow USB debugging” prompt will appear on your device. You need to allow the link.
- Step 7’s re-entered command is the final step. If you followed the instructions correctly, the serial number of your device should appear in the Terminal app on your macOS computer.
How to set up ADB on Linux
- Grab the Linux-compatible Android SDK Platform Tools ZIP file here.
- Unpack the.zip file somewhere convenient (like the Desktop for example).
- Launch the Terminal.
- Type in this command: To access the folder from which ADB was extracted, type “cd /path/to/extracted/folder/” to switch directories.
- cd /Users/Doug/Desktop/platform-tools/, for instance
- Use the USB cord to link your gadget to the computer running Linux. Transfer files between devices using the “file transfer (MTP)” connection mode. This may not be required for all devices, however it is strongly suggested to ensure smooth operation.
- The ADB daemon can be started by typing./adb devices in the Terminal once you have navigated to the same folder as your ADB tools.
- When you reconnect your mobile device, you’ll be prompted to enable USB debugging. Don’t hesitate to agree to it.
- Re-entering the instruction from Step 8 is the final step. If everything went as planned, the serial number of your device will appear in the Terminal window.

Also Read:
How to run Android apps on any Windows 11
How to preload Overwatch 2 PC without buying Overwatch
Using Online Platforms to Better Manage Your Time
How to Activate Night Mode in Apple Watch
Congrats! Your device is now ready to receive any ADB command. Use our comprehensive list of guides to begin modifying your phone immediately.
It’s worth noting that for some Linux users, ADB installation may be far simpler than usual. If you’re using a Debian-, Ubuntu-, or Fedora-based Linux distribution, you can skip the first two steps of the above guide and instead run one of the following commands.
Debian/Ubuntu-based The following command will install ADB for Linux users:
- Inserting android-tools with sudo apt-get
- -adb Fedora/SUSE-based Those using Linux can simply enter the following command to set up ADB:
- Using the command: sudo yum install android-tools
In contrast, the latest binary from the Android SDK Platform Tools release is always the best bet, as the distro-specific packages frequently ship out-of-date binaries.
To be on the safe side, we should mention that when utilising the extracted binaries from the Platform Tools ZIP, users may need to prefix the ADB commands we offer in future lessons with a./. The average *nix person (or Windows user with PowerShell) probably already knows how to accomplish this, but we’d still like as many people as possible to be able to learn how to make these adjustments to their Android devices.
Comments are closed.