


Sometimes, the only solution for your PC or a laptop to stop lagging is to reinstall its Windows. If you wish to sell your device, reinstalling is also needed. Regardless of the reason, it’s convenient to know how to reinstall Windows 10 on your device.
It happened to me a couple of months ago that a virus infected my laptop. Despite all my attempts to use Anti-viruses and clean up my device, it wasn’t possible. It seems it was a persistent one. That’s when I decided to reinstall the Windows, and the problem was solved.
It sounds like a lot of work, but it’s actually not. For most of the job, your PC or a laptop can handle itself. All you need to do is to point it out in the right direction. I will show you how through this short guide.
Table of Contents
Backup your device
Of course, before performing a Windows reinstallation, you need to make sure you have all of your data backed up. Since Windows 10 reinstall can erase everything you have on your device or possibly lose some of your data, it’s the safest first to store everything. Luckily, Windows 10 gives you an easy option to backup and save all of your files using the built-in backup feature.
Follow the steps below to back up your device.
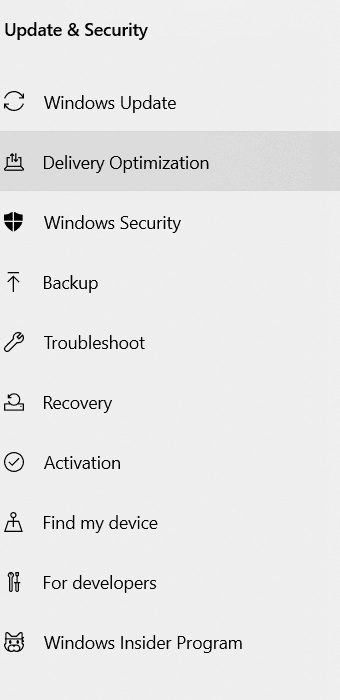
- Type “Windows Update” in the search bar next to the Start button
- Select “Windows Update Settings”
- Click on “All Settings” > “Update & Security”
- Select “Backup”
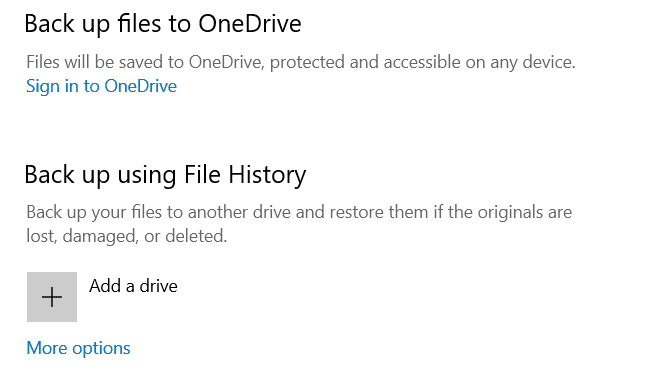
You will see backup using File History. If the toggle is switched ON, your device was doing the backup of your files all along. This feature is backing up your contacts, desktop files, and data using the OneDrive folder. However, if you wish to save all the general folders, add them to the library in order to keep them.
If the File History toggle were OFF, you would see an option to add a drive. Click on “+,” and you will see an option to choose a drive to backup your data. Select a drive from the Windows offer, and the File History toggle will be turned on automatically.
Now, when you are sure your data are safe, we can go to reinstalling your Windows 10.
Roll Back Windows 10
If there is an issue with your device, lagging, or a glitch, all you need to do is to return to the previously installed version of your Windows 10. This operative system gives you an option to restore to the previously installed version without reinstalling the Windows completely. Follow these steps.
- Type “Windows Update” in the search bar next to the Start button
- Select “Windows Update Settings”
- Click on “All Settings” > “Update & Security”
- Click on “Recovery”

- You will see an option “Go Back To Previous Version Of Windows 10”
- Click “Get started”
Now you’ll be asked to fill up a couple of details, including why you are returning to the previously installed version of Windows 10. After the survey, your computer will look for updates that can fix the issue you’re facing. After you start searching for the correct files to roll back your previous Windows 10 version, the system will search for the correct files. If the earlier version was installed long ago, high chance that files won’t be found. In this case, it’s better to try another option. If the files have been found, click on “Windows Rollback” on your screen.
Wait a bit, and after your computer is done, that’s it. You are back to a previous version, and hopefully, the lagging issue has been resolved.
How to reinstall Windows 10 without CD and activate it again?
If the issue you have is too big and cannot be resolved by rolling back to the previous Windows 10 version, you need to reinstall your Windows completely. Thankfully, this one is not hard either.
- Type “Windows Update” in the search bar next to the Start button
- Select “Windows Update Settings”
- Click on “All Settings” > “Update & Security”
- Click on “Recovery”
- Click on “Reset your PC” > “Get started”
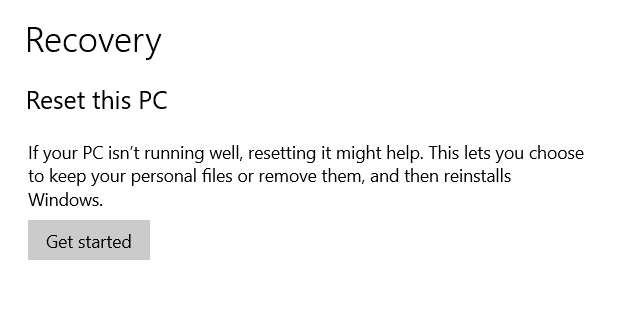
- Now you can select the option to keep your files or to erase everything, depending on the severity of the issue you are facing
- The system should reboot automatically
- After it’s finished, your device will be turned on
Note: If you are reinstalling Windows 10 on your laptop, make sure to plug in the charger so your battery drain won’t bother the process of reinstallation.
Sometimes, after you reset your PC or roll back the old version of Windows 10, you need to activate your Windows again. It’s done using the product key that is usually printed on your Certificate of Authenticity. Go to the “Recovery” tab again and type in the product key. That’s it; your Windows has been reactivated.
How to reinstall graphic drivers on Windows 10?
In case you have issues with your graphic drivers, and this is causing the glitch of your device, you can simply reinstall them. You should be aware that your drivers’ newest updates, including graphic drivers, are automatic through Windows Updates. That’s a cool feature of Windows 10. However, if you want to reinstall drivers in case of an issue, follow the steps below.
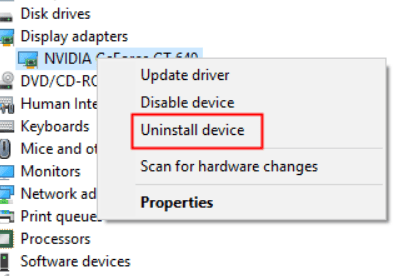
- Type “Device Manager” in the search bar next to the Start button
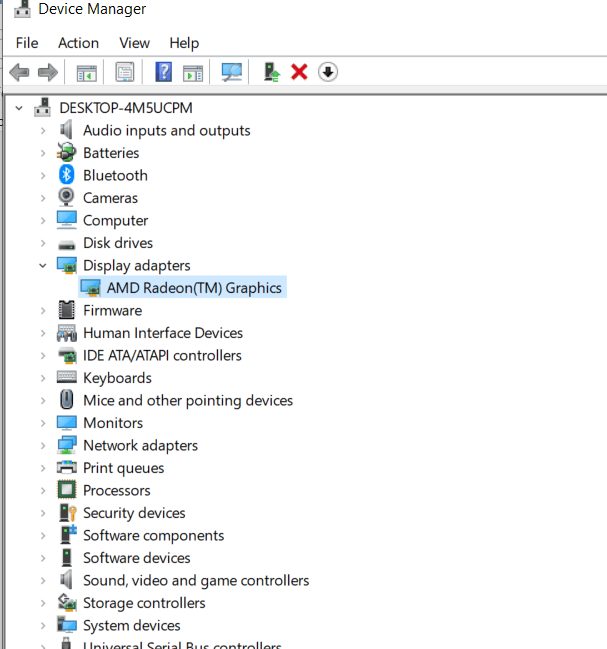
- Right-click on the name of the driver and select “Uninstall”
- Reset your PC / laptop
- The device will automatically attempt to reinstall the drivers
In case you need additional help, you can visit here
Another option to try after uninstalling drivers through Device Manager is to download drivers directly from the graphic card manufacturer’s website. After downloading, you can install them again. In order to download the correct drivers, you need to know the exact model of your PC and your graphic card, as well as the OS version.
If you do not know the specifications of your device, it’s recommended not to try guessing. In this case, you can download Driver Easy.
This software is helping you choose the proper drivers for your PC or a laptop without a struggle. A FREE version downloads all the drivers you need to install manually and a PRO version that is downloading and automatically installing all the drivers for you. A good thing about this software is that it can be used for just any driver, not only graphic cards. And it works on Windows 7 as well.
- Download and install Driver Easy
- Run the software and click “Scan now”

- Click “Update” next to graphic drivers to automatically download drivers you need
- After the drivers are downloaded, if you are using the FREE version, you will run the installation and install them yourself
There, it wasn’t that hard, right?

If you have other suggestions on how to reinstall Windows 10 and the graphic drivers of your device, I would be more than happy to hear you out. Please leave the comment in the section below!
Comments are closed.