

How to make Nvidia record desktop, ShadowPlay, now called NVIDIA Share, allows users to quickly and easily capture gameplay, live-stream it, and share it with viewers all over the world. With the PS4 and Xbox One, it can record games automatically in the background or just when instructed to. Possibilities of using this function increase if your own computer has up-to-date NVIDIA graphics hardware. It’s a lot like the Game DVR in Windows 10, except it’s more robust and supports Windows 7 as well.
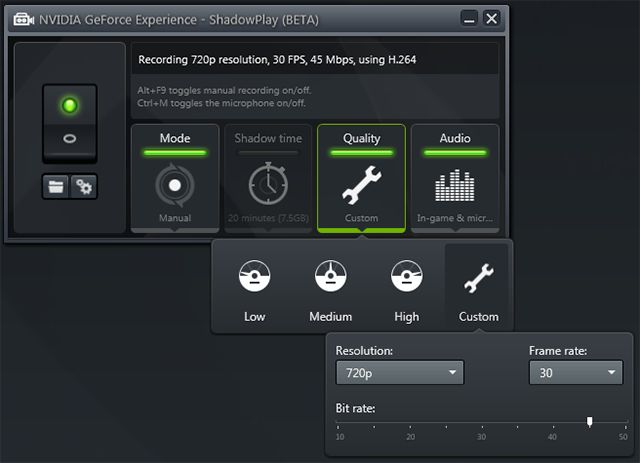
Table of Contents
Does Nvidia record Impacts Game Performance
But before we get started, there is something you should know: ShadowPlay will have a minor impact on your game’s performance. According to NVIDIA, this performance hit averages 5% but can reach 10% in the most taxing games.
This probably won’t be an issue if your computer is fast enough. System resources are required by any gameplay recording solution, including Windows 10’s Game DVR. In any case, you should probably turn off ShadowPlay when you’re not using it.
Update: How to Record GamePlay With NVIDIA Share
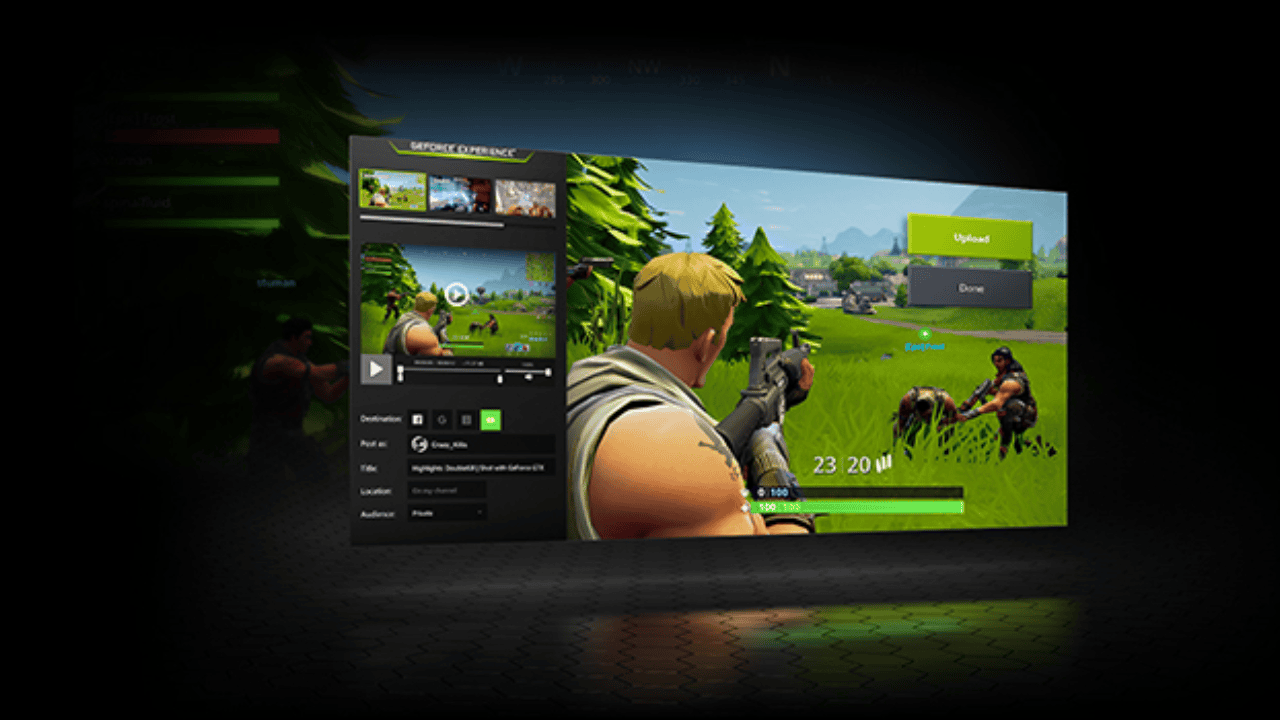
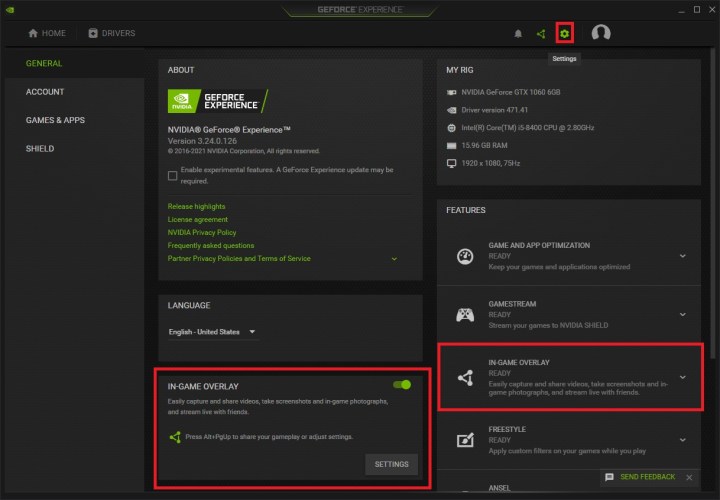
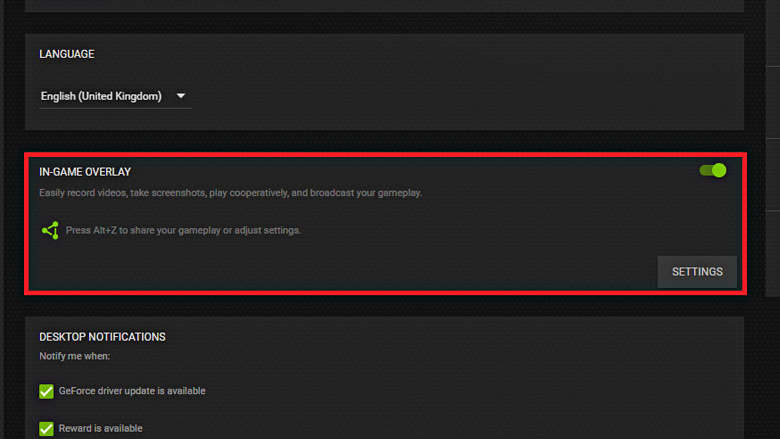
ShadowPlay is now called NVIDIA Share, and the user interface has been updated to reflect the new name. The NVIDIA GeForce Experience overlay allows for management of NVIDIA Share (ShadowPlay). Press Alt+Z to bring up the overlay. To view what’s missing, use the “GeForce Experience” programme from the Start menu. In order to access the overlay, hit the green “Share” button located to the left of the settings button on the toolbar.
- Install NVIDIA’s GeForce Experience app if it isn’t already running. Not only does this programme include ShadowPlay, but it also upgrades your NVIDIA graphics drivers, optimises your game settings with a single click, and allows you to broadcast your games directly from your computer.
- Click the “Instant Replay” icon, then “Turn On,” to enable ShadowPlay’s Instant Replay mode and begin automatically recording your gameplay.
- If you have Instant Replay turned on, pressing Alt+F10 will preserve the most recent five minutes of gaming. Without a manual saving, NVIDIA Share will automatically delete your gameplay captures.
- The “Record” button’s “Start” or the keyboard shortcut “Alt+F9” initiates immediate recording. Infinite recording is available in NVIDIA ShadowPlay.
- Pressing Alt+F9 again will pause recording, or you can open the overlay, click the “Record” button, and then click the “Stop and Save” button to end the recording session.
- Click the microphone and camera buttons on the right side of the overlay to record either voice or video from your webcam.
- ShadowPlay’s preferences can be adjusted by going to the overlay, clicking the “Instant Replay” or “Record” buttons, and then clicking “Settings.” You can customise the video in many ways, including how it looks and how long it lasts.
- By clicking the gear icon in the upper-right corner of the overlay and then clicking “Keyboard Shortcuts,” you may customise the overlay’s default keyboard shortcuts, such as the Alt+Z shortcut to open it and the Alt+F9 and Alt+F10 shortcuts for recording.
- The settings menu additionally provides access to other customizability options. Under Settings > HUD Layout, you can adjust the position of the in-game webcam and the FPS counter, among other options.
- As a default, your gameplay recordings will be stored in a game-specific folder within your profile’s Videos folder. You can locate recordings of your desktop, for instance, under the folder C:UsersNAMEVideosDesktop.
- Click Settings > Recordings in the overlay to modify the location where “Videos” will be stored.
Check if Your PC Supports ShadowPlay
This article has been updated for the year 2020 to reflect the current state of knowledge on ShadowPlay (now called NVIDIA Share). For further information on how to use it with the most recent versions of NVIDIA’s software, please refer to the aforementioned instructions. For posterity’s sake, we’ve kept these original ShadowPlay instructions for use with earlier releases.
If you’re looking for a list of NVIDIA graphics cards that are ShadowPlay compatible, you can find one on the NVIDIA website. Nonetheless, if your PC is equipped with NVIDIA hardware, you can simply check there.
Launch the “GeForce Experience” programme from the Start menu to do this. Install NVIDIA’s GeForce Experience programme if it hasn’t already been done. Not only does this programme include ShadowPlay, but it also upgrades your NVIDIA graphics drivers, optimises your game settings with a single click, and allows you to broadcast your games directly from your computer. To see if your PC can run the application, go to the “My Rig” section of the menu and choose the “ShadowPlay” option. If this happens, ShadowPlay will be declared “Ready.” In case it doesn’t, the programme will explain why.
How to Record or Stream Gameplay With ShadowPlay
ShadowPlay is disabled and does nothing in the background by default. Launch the NVIDIA GeForce Experience application and then select the “ShadowPlay” option in the menu bar.
- To activate ShadowPlay, toggle the switch on the left side of the window. When NVIDIA ShadowPlay is on, the indicator light will become green.
- The “Shadow & Manual” mode is activated automatically in ShadowPlay. With Shadow Mode activated, the most recent five minutes of gameplay are saved automatically. ShadowPlay allows you to record the most recent five minutes of gaming and store it in your Videos folder using a simple keyboard shortcut: Alt + F10. In Manual mode, you can use the shortcut key combination of Alt+F9 to begin recording a clip and the same combination to end recording. ShadowPlay’s live FPS counter can be viewed in any game, recording or not, by pressing the shortcut Alt+F12.
- If everything looks good to you, you can start recording right away; you can always make adjustments after enabling ShadowPlay (as explained later in this article). The above shortcuts can be used immediately after starting a game to start recording gameplay and displaying the FPS counter. By default, your game’s recordings will be placed in a subfolder of your Videos folder labelled with the name of the game
How to Record OpenGL Games (and Your Entire Windows Desktop)
ShadowPlay from NVIDIA may not automatically work with all games. ShadowPlay is only compatible with Direct3D games and not OpenGL games. While Direct3D is used in the majority of games, OpenGL is used in a select number. Above, we used the game DOOM as an example; OpenGL is also used by the popular game Minecraft. OpenGL games that aren’t compatible with ShadowPlay can be captured by enabling the “Allow Desktop Capture” option in the NVIDIA GeForce Experience > Preferences > ShadowPlay menu. You can now capture your entire Windows desktop with ShadowPlay, including any OpenGL games that are running in a window. In this setting, neither the FPS counter nor the automatic “Shadow” recording function. On the other hand, you can still use the hotkeys to initiate and terminate manual recordings.
How to Configure NVIDIA ShadowPlay
ShadowPlay’s preferences can be adjusted using the buttons at the program’s toolbar. Either the “Shadow” mode, which only records the most recent five minutes of gaming, or the “Manual” option, which only records gameplay manually, are available. Instead of recording your gaming and saving it to your hard drive, you may utilise NVIDIA ShadowPlay to stream it live on Twitch.
- Under “Shadow time,” you can adjust the amount of time that ShadowPlay buffers. There’s a window of opportunity between one and twenty minutes. Always keep in mind that more time equals more storage space needed. It’s up to you to decide how much extra space you want to provide for the higher quality.
- By selecting “Quality,” you can adjust the audio recording’s quality. The default setting is High, which captures video at the native resolution of the game at 60 frames per second at 50 Mbps quality in an H.264 container. If you prefer to fine-tune your sound independently, you can bypass the preset Low and Medium settings by selecting the Custom profile.
- You can select which audio tracks to record alongside your video using the “Audio” menu. All game sounds will be captured by default. You can also disable all audio recording by selecting “Off,” or you can choose “In-game and microphone” to include your voice from within the game itself.
- The two buttons to the left of the switch take you to the folder where your recordings will be saved (called “Videos” in your user profile) and the ShadowPlay settings box, respectively. The GeForce Experience preferences menu includes a shortcut to this window under Preferences > ShadowPlay. The preferences screen allows you to choose overlays–you can overlay your webcam, status indicator, or an FPS counter and choose where the appear. If you want to include a microphone, you have the option between “Always On” and “Push-to-talk.”
- You can set up shortcuts for things like recording, streaming, switching cameras, and activating push-to-talk on your microphone. In addition to the default Videos folder, you have the option of choosing a new save place for your recorded videos. If you want to record gameplay using AMD graphics technology, you’ll require a third-party application like Nvidia’s ShadowPlay.
Also Read:
What is the difference between Nvidia GeForce and RTX: Comparison Table
Stray on NVIDIA GeForce GTX 780 Leads the Industry With the Fastest Frame Rates
Nvidia Shield Tv is the Exception to the Disposable Technology Rule
FAQs:
Q1: How do I record my desktop with Nvidia GeForce experience?
With GeForce Experience, you may also manually record your games if you so choose. When using the GeForce Experience overlay, simply select the record button to begin recording. By default, you can utilise a hotkey without entering the overlay by pressing Alt+F9.
Q2: How do you record your desktop screen?
- Windows: Shift+F9.
- Mac: Control+Shift+Spacebar.
Q3: How do I record my desktop with Nvidia laptop?
Whether you want to utilise the shortcut “Alt+Z” or the “Share” icon, you’ll have quick access to the robust features you know and love. This overlay makes it easy to utilise GeForce Experience’s capabilities, allowing you to capture gameplay at 60 FPS at resolutions up to 4K in both full-screen and windowed modes.
Q4: How do I record my screen on Windows 10?
- Microsoft Stream’s Create > Record screen option.
- To give Microsoft Stream access to your camera and microphone, your browser must be set to allow access.
- If you choose to block, your device’s camera and microphone will be turned off.
- Make a selection by clicking the Webcam or Microphone icon.
- You can now begin the recording process.
Q5:How do I enable Nvidia overlay?
The familiar capture and record tools can be accessed with a single click of the Share button or by pressing the “Alt+Z” shortcut key. This overlay makes it simple to take use of GeForce Experience’s support for recording gameplay at up to 4K resolution and 60 frames per second.
Comments are closed.